Creating, updating, and deleting
So far we've learned how to query, filter (search), and sort collections of
resources. We've also looked at some details of an individual resource. These
are all read-only operations done with the GET method. Now, let's take a look
at how to create, modify, and delete resources.
The Core Concepts page provides an overview and summary
of the REST API and its usage. If you haven't read it yet, you might want to
skim over that before proceeding with the tutorial. In particular, the
Creating objects with POST
and
Modifying objects with PUT
sections are relevant here.
Create with POST
As mentioned here, there are HTTP methods
that correspond directly to each of the so-called "CRUD" operations - create,
read, update, and delete. In order to create an object, we must use the POST
method in HTTP.
(POST on MDN)
Unlike in the "classic" SOAP-style jxAPI, where POST is
used for virtually everything, in the REST API we mainly use POST to create
new resources or entities. Note that a "resource" doesn't have to be a primary
object like a user account or a project, but can be more ephemeral or abstract
like creating a notification or submitting a long-running task request.
For now, let's take a look at creating new Entry Codes, specifically a "Bill
Type" (the DB table codes_bill_types). Entry Codes (values in Entry Columns in
user time sheets) are referred to in the API using their codes_* internal
table names.
To create a new Bill Type, we simply need to make an HTTP POST request to the
Bill Types collection endpoint, where the body of the request is a JSON
representation of the object we want. We don't necessarily have to include every
possible field that a Bill Type can have. Typically each API will have a set of
minimum fields that required to be in a POST (create) request, and these will
be documented in the API Reference section.
For Bill Type, there are only a few required fields: pname, autoadd,
loggable, and is_hidden. If we fail to supply any of these fields, our
request will be reject with a 400 Bad Request error response. So let's try
making a Bill Type.
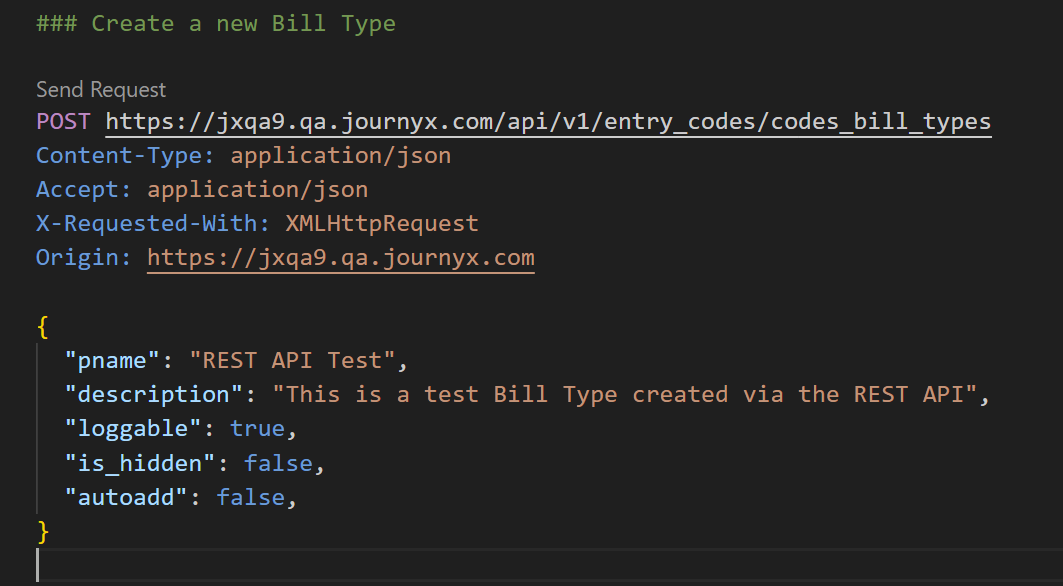
Note that several request headers are required, including Content-Type,
X-Requested-With, and Origin, along with an
authentication header. These were
discussed earlier.
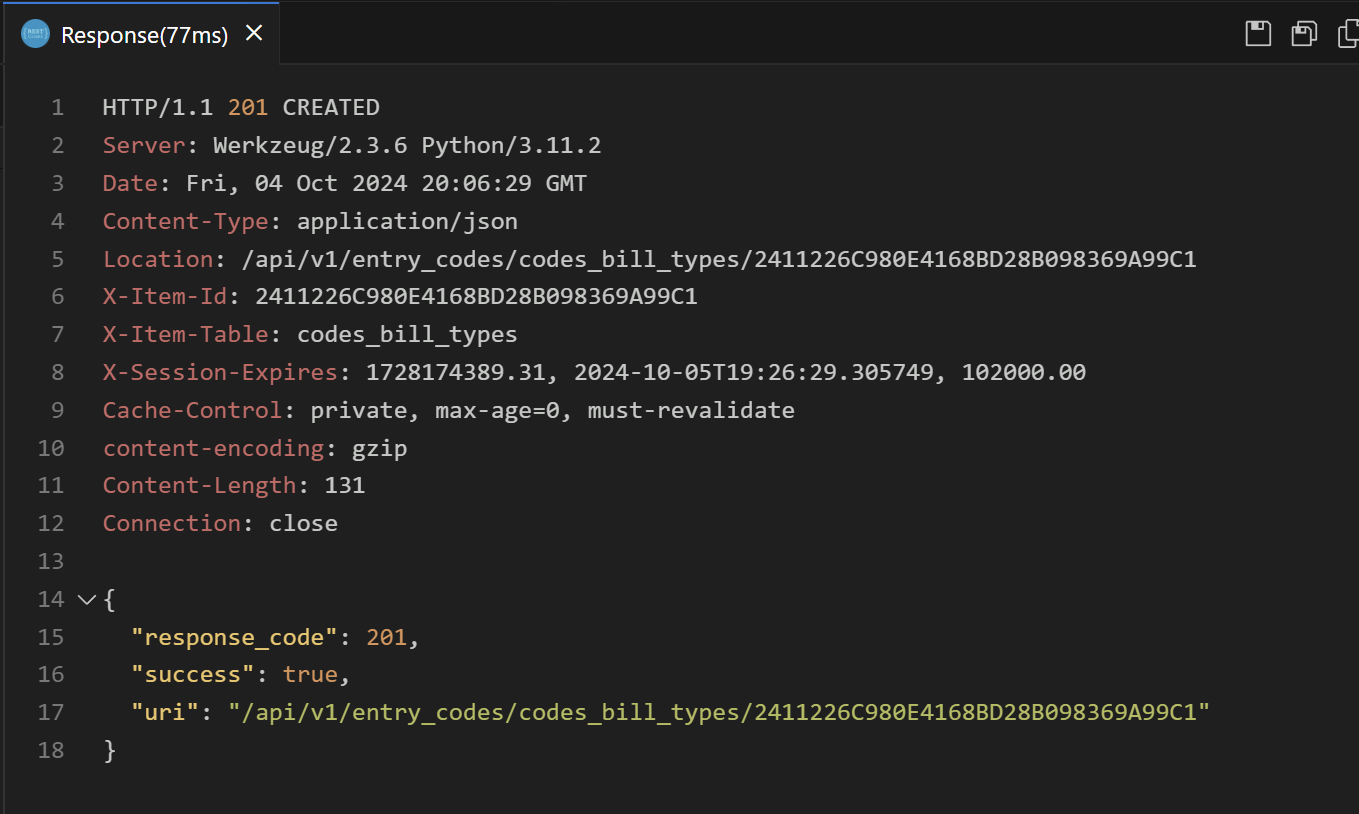
The server should respond with something like:
If the server responds with a 400 Bad Request, especially with the message "No data provided", it likely means that your request body was not correctly formatted JSON. In particular, you must follow all the rules of JSON syntax, such as double-quoting all strings, and not using single quotes. Also, there cannot be any trailing commas in the JSON object.
Note that with a successful POST, there response code will be a 201 Created
response as shown above. The response body is minimal and does not provide the
full representation of the object. Instead, it provides a uri field where you
can find the newly created object. The Location header also provides the same
URL. Notice that it also tells you the new object ID and database table with the
X-Item-Id and X-Item-Table response headers. Let's retrieve the newly
created object now.

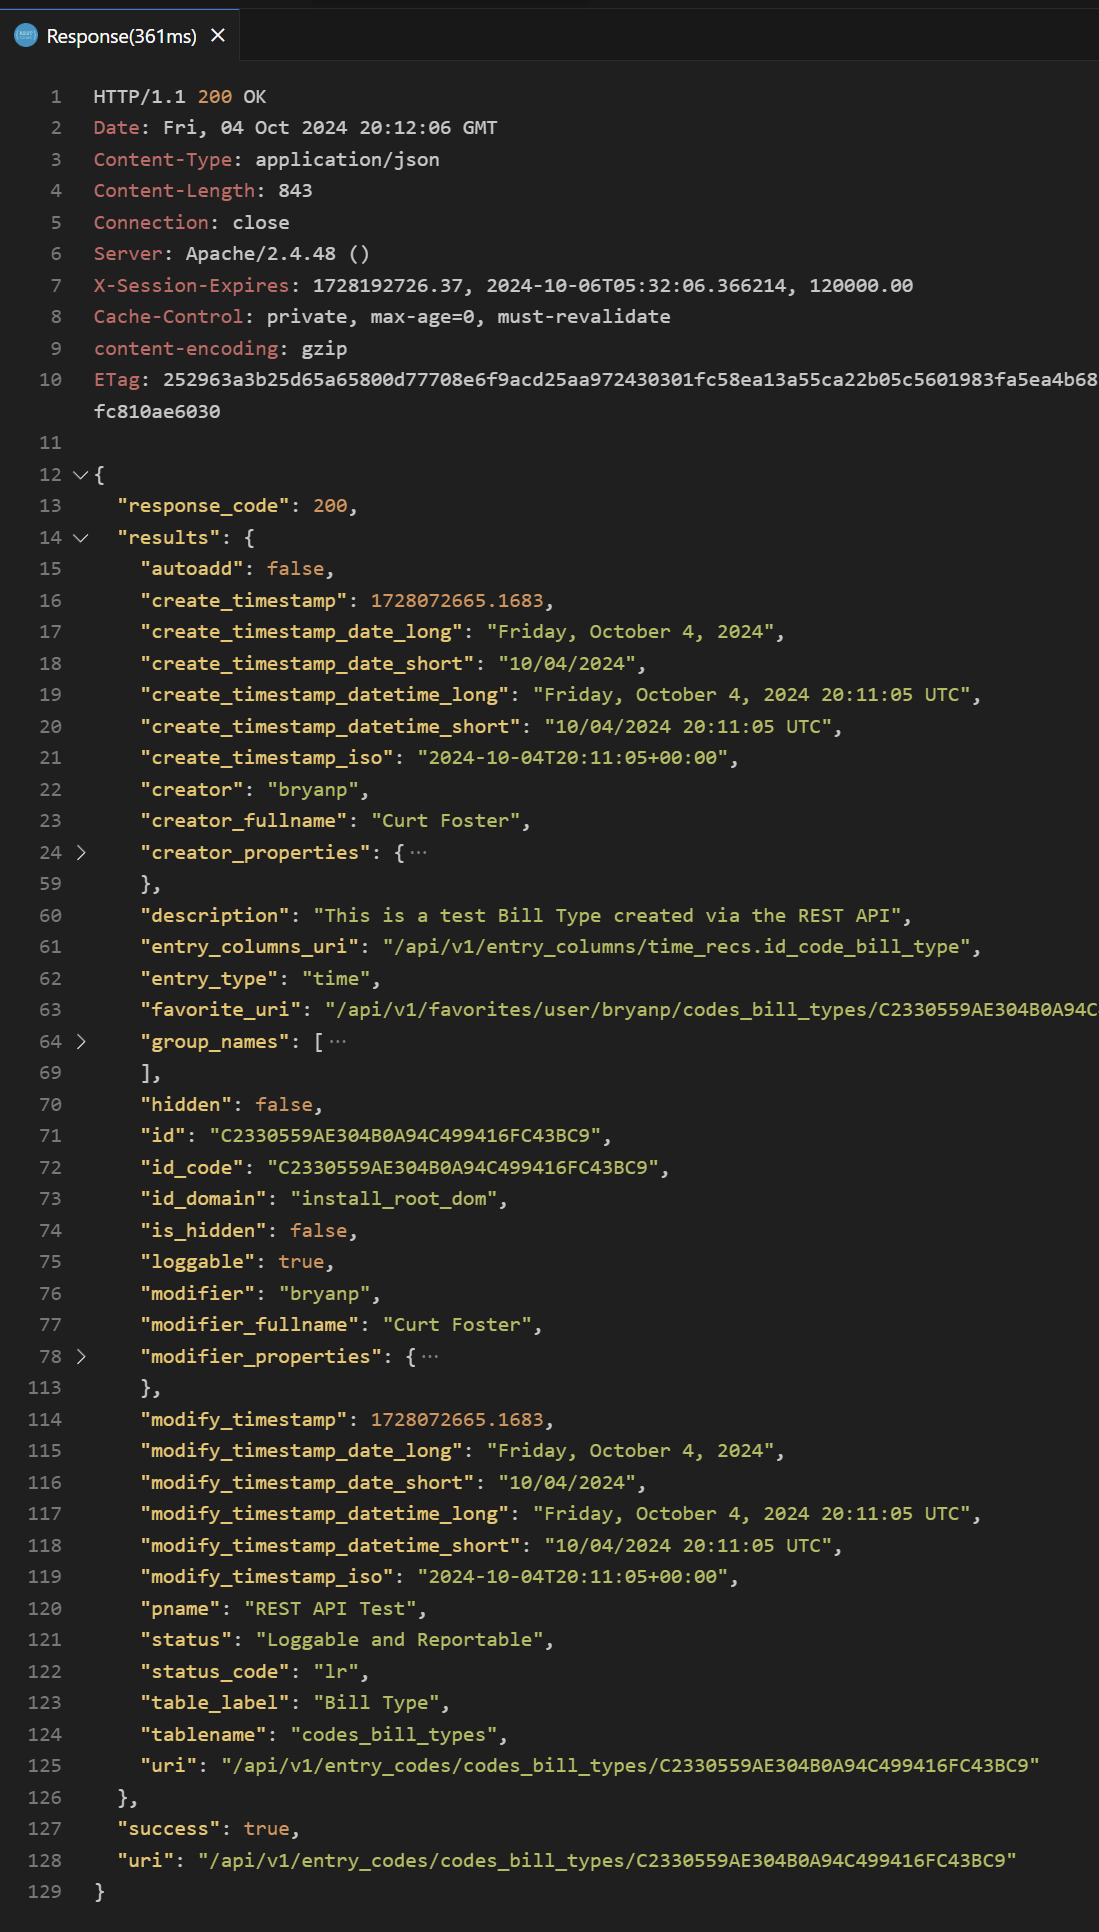
As you can see, the response contains quite a few more fields that you
originally submitted in your POST create. Note that if you try to POST the
same object again, depending on the API endpoint, you may get a 409 Conflict
error response telling you that another object with the same name already
exists.
There is one very important header to note in that last GET response; the
Etag header will become important when you try to submit a change. Copy that
to a temporary area to use in a few moments.
Modify or update with PUT
Use the PUT method to submit a modification to an existing resource.
(PUT on MDN)
Note that a strict interpretation of HTTP semantics would mean that PUT should
only accept complete representations, and PATCH should be used for partial
representations. That said, to keep things simple, we are using PUT for all
types of modifications, whether you submit a complete representation or not.
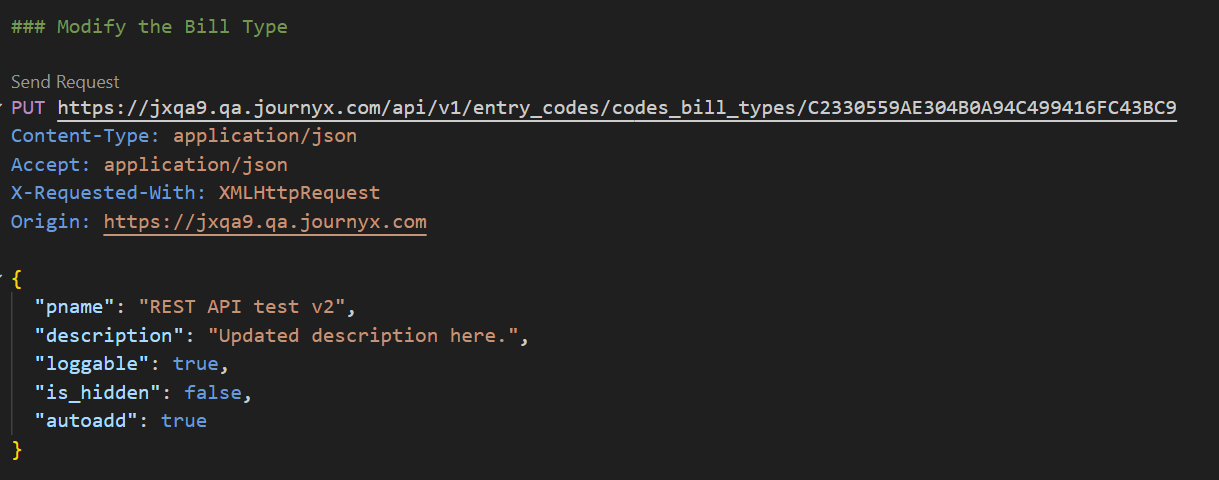
We can copy the representation of our new object we created above, and submit
some changes to it. Note that you can't just copy and paste the entire
response from the GET because it contains an "outer wrapper" object; only copy
the results value into the PUT request. Once you have done that, you can
tweak some fields to make a change. Note that changes are not accepted in all
fields; some are read-only. Generally, the server will ignore it if you try to
make any changes to these fields.
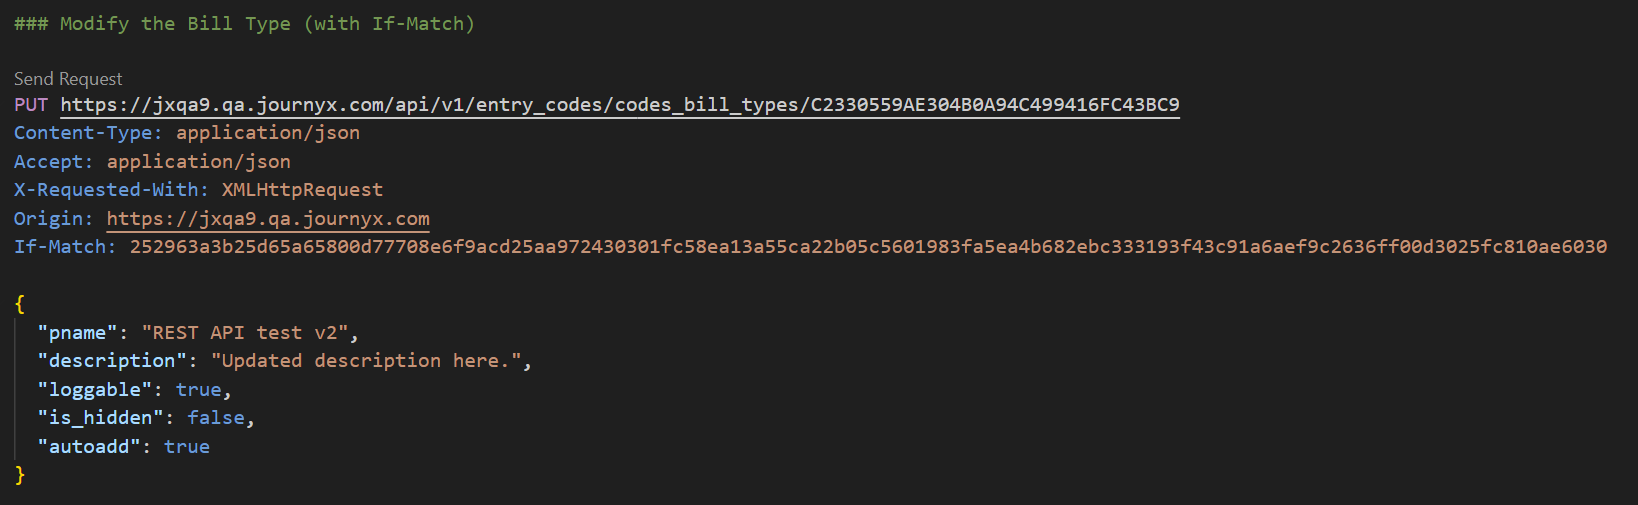
Let's tweak the pname and also update the description field and modify it
with PUT.
Unfortunately, the server responds with an error:
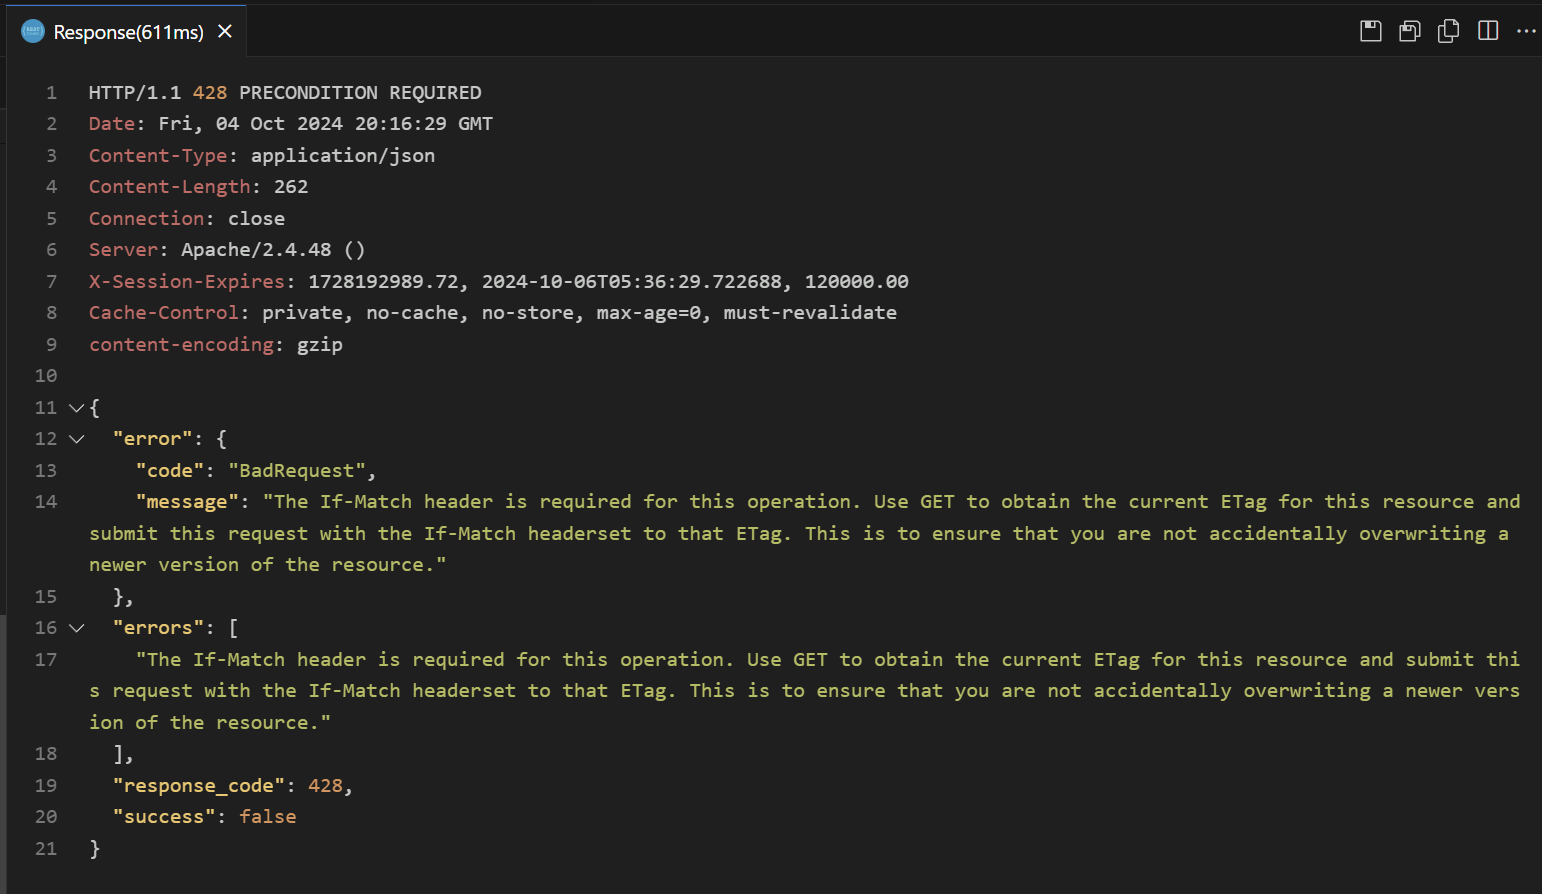
As the error mentions, we failed to provide the If-Match header. It says: the
If-Match header is required for this operation. Use GET to obtain the current
ETag for this resource and submit this request with the If-Match header set to
that ETag. This is to ensure that you are not accidentally overwriting a newer
version of the resource.
What on earth is it talking about? The ETag header we mentioned earlier. ETag
is like a version code for a resource that gets updated after every change. This
is the mechanism that ensures users don't accidentally stomp on each other's
changes when submitting PUT requests around the same time. It ensures that
each user is working with the latest version of the object when submitting any
changes.
Therefore, we have to grab the current ETag from a GET request, and supply
that as the If-Match header to our PUT request. This ensures we're working
from the latest version. If our version is out of date (or we forget to give
ETag at all), we get the 428 Precondition Required error response. As long as
we get the latest ETag, it's up to us (the client) to sort out any differences
between these competing versions. As long as we submit the correct current ETag,
the server will accept our changes.
So let's submit the same PUT request, but add an If-Match header with the
ETag we got with that last GET call:
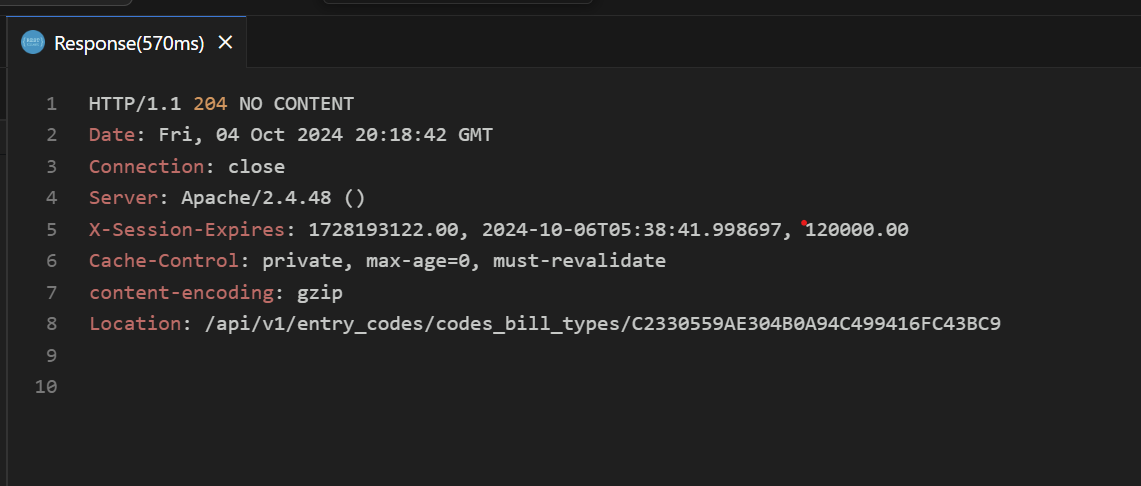
Now, the server is happier and responds with 204 No Content. This means the
change was accepted. Any other response such as 400 Bad Request would indicate
that the change was not accepted.
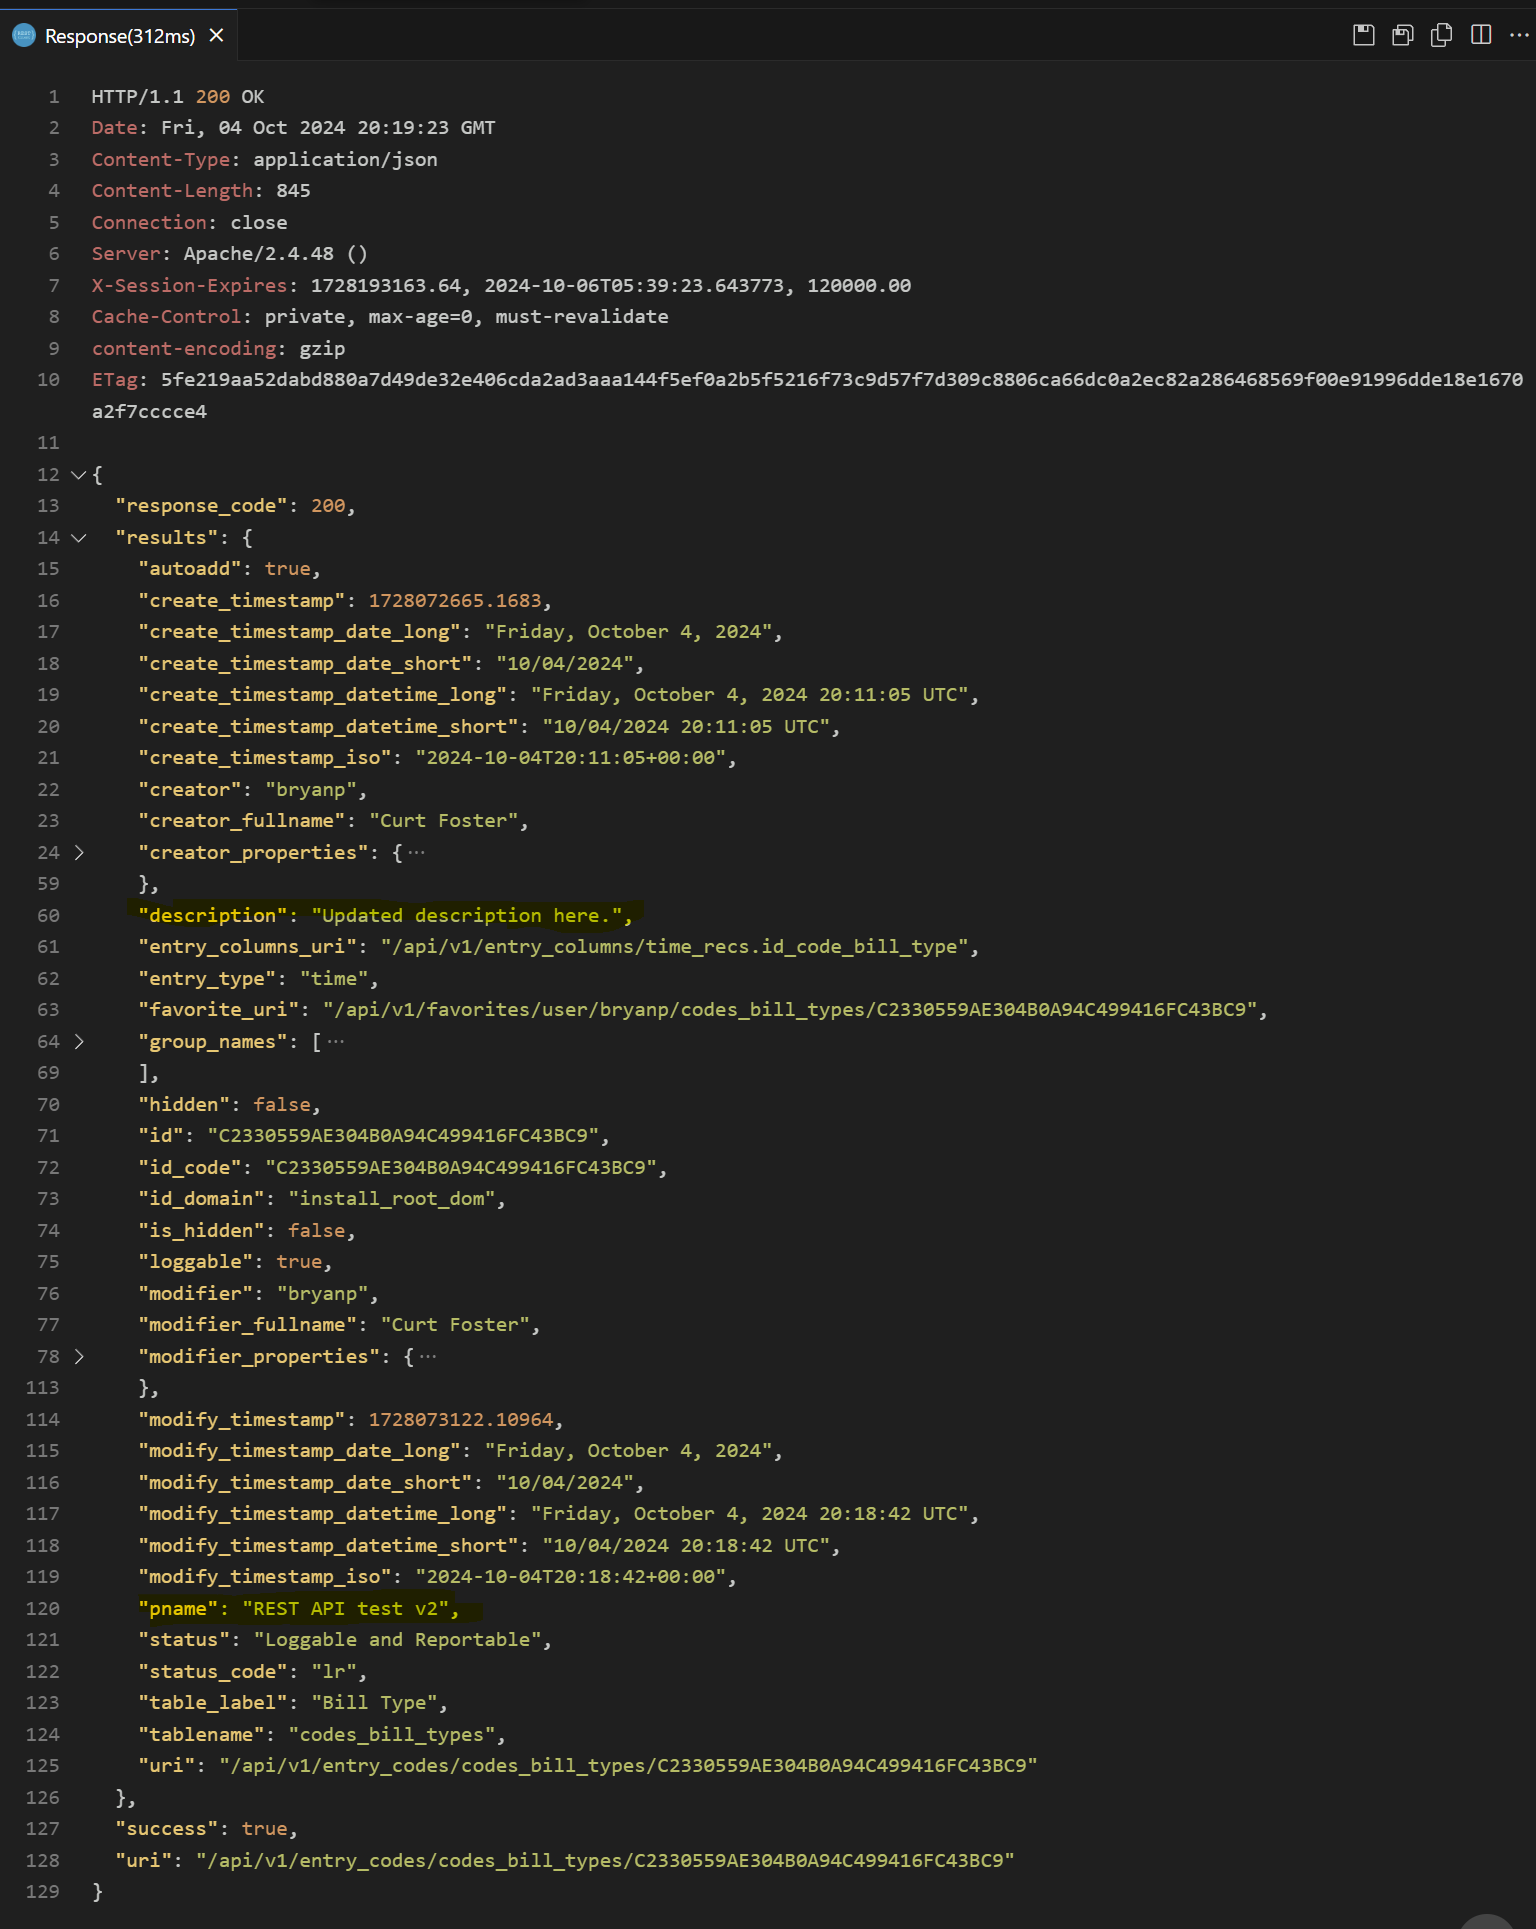
Now if we GET the same object again, we see our changes reflected along with a
new, updated ETag.
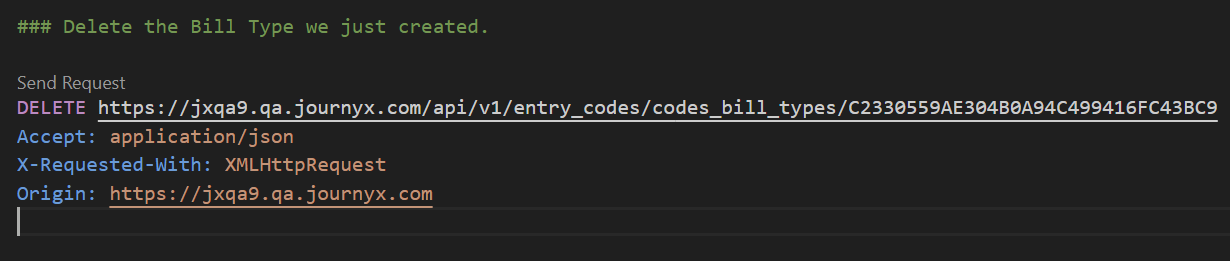
DELETE
That covers the basics of modifying resources with PUT. As you might expect,
deleting resources involves using the HTTP method DELETE.
(DELETE on MDN)
Using DELETE is quite a bit simpler than other methods, as you don't need to
supply any representations or anything; just call DELETE method on the
appropriate resource URL. Obviously, this will be subject to the normal
authorization controls. If you're not allowed to delete the object you will get
a 403 Forbidden error. Note that we still need to provide the usual
X-Requested-With and Origin headers. We don't need Content-Type because we
aren't supplying a request body.
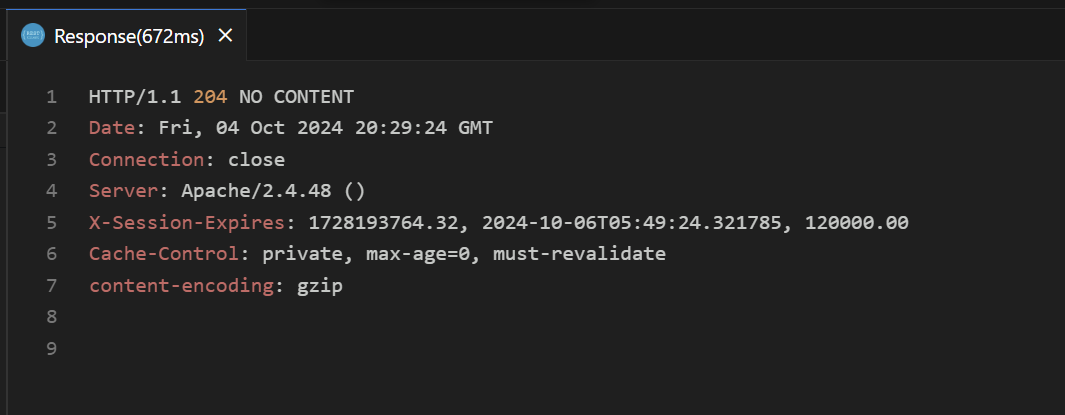
If the delete worked, the server responds with 204 No Content. (There's no response body content because the object is now gone.)
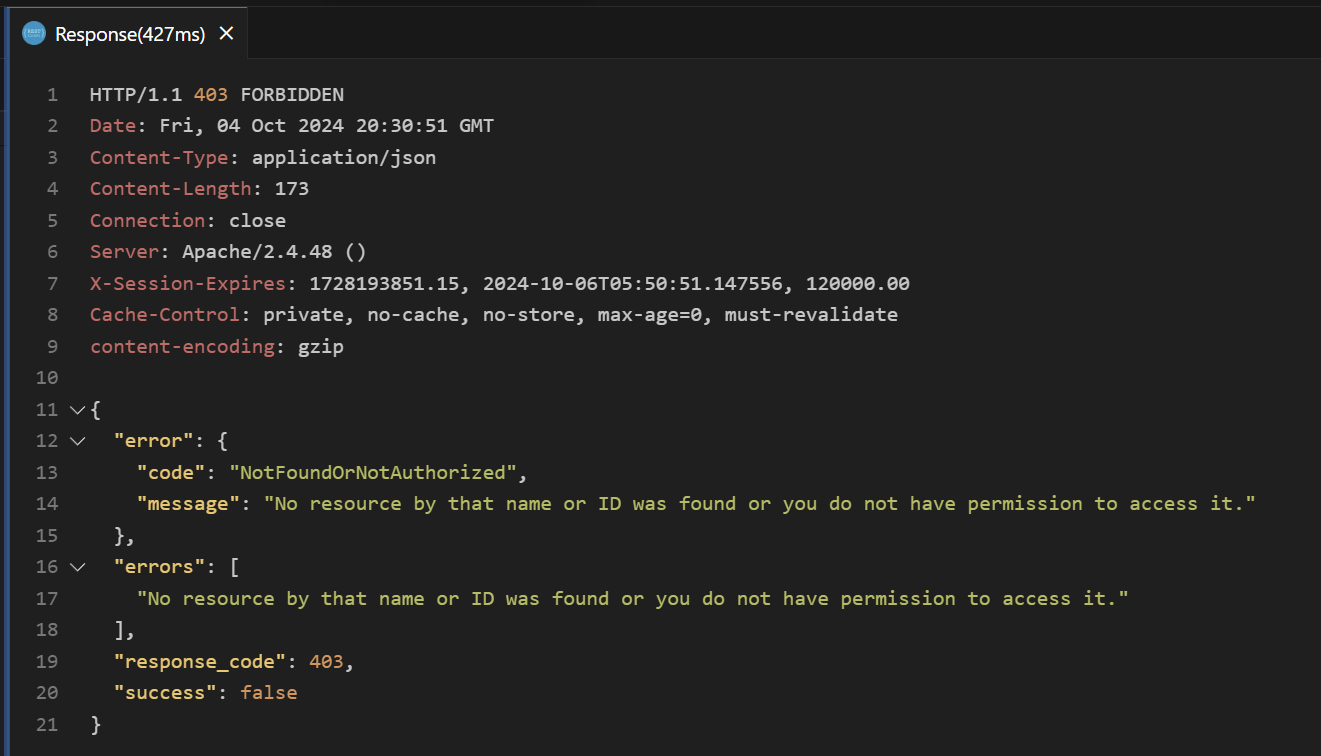
If we try to GET that same URL, we'll get a 403 response indicating that it's gone. (For security reasons, our system doesn't distinguish between 404 Not Found and 403 Forbidden.)
Conclusion
Hopefully at this point you have gained a basic understanding of how to interact with the REST API. In this tutorial, we showed making direct requests using the REST Client extension in VS Code. However, in the real world, typically you'll be writing requests in JavaScript or Python or another language. The next chapter will show you the basics of talking to the Journyx API through client programs in Python, JavaScript, and C#.