OAuth 2.1 for client applications
This page explains how a client application obtains and uses OAuth 2.1 Bearer tokens to call the Journyx REST API on behalf of a signed-in user.
OAuth is the recommended way to build a user-delegated integration: an app where a real Journyx user signs in, sees exactly what your app is asking for, and grants (or revokes) that access. Typical examples include mobile and desktop apps, third-party integrations, and AI/agent clients.
OAuth support is a licensed feature, and the Journyx authorization server is turned off by default. Before any of the flows on this page will work, your Journyx administrator must enable it and approve your app. See What your administrator must do first.
If you are writing a headless script, a scheduled job, or a server-to-server integration (for example, an ERP or HR sync) that runs without a person present to sign in, OAuth is not the right tool today — there is no client-credentials / machine-to-machine grant (see What is not supported yet). Use an API Key with the session-cookie flow instead.
How it works at a glance
Journyx acts as an OAuth 2.1 Authorization Server (AS). Your app sends the
user to Journyx to sign in and consent, receives an authorization code, and
exchanges that code for an access token. Your app then sends the access
token as a Bearer token on each REST API request.
- The only supported interactive grant is Authorization Code with PKCE
(
S256). All clients are public clients — there are no client secrets. - Access tokens are opaque (not JWTs) and short-lived (15 minutes by default). Long-lived access is maintained with a refresh token.
- Bearer tokens are accepted only on
/api/v1/*endpoints, and only in theAuthorizationheader. - Each token carries a set of scopes that limit what it can do. A token can never do more than the user could do; scopes only narrow that down further.
What your administrator must do first
A connection involves several safeguards, all controlled by a Journyx
administrator. Until these are in place, the OAuth endpoints return 404 and
Bearer tokens are ignored:
- License — the site's license must include the OAuth entitlement. Without it, the OAuth settings are hidden and the authorization server cannot be enabled.
- Enable the authorization server — an admin turns on the OAuth authorization server in System Settings.
- Register and approve your app — your app must be registered and approved by an admin before any user can connect to it. See Registering a client application.
- Grant the "Connect New External Apps" ability — the user connecting your app needs this ability (granted through a role).
- Allowed scopes and consent levels — an admin can restrict which scopes may be granted on the site and customize the consent "connection levels" your users choose from.
The step-by-step administrator instructions (enabling the server, approving apps, managing allowed scopes) live in the Journyx in-product help, not in this developer reference. This page focuses on what an app developer needs to do.
Discovering the endpoints
Journyx publishes standard discovery documents so your client can find the authorization server's endpoints without hard-coding them.
Authorization server metadata (RFC 8414):
GET /.well-known/oauth-authorization-server HTTP/1.1
Host: example.apps.journyx.com
{
  "issuer": "https://example.apps.journyx.com",
  "authorization_endpoint": "https://example.apps.journyx.com/oauth/authorize",
  "token_endpoint": "https://example.apps.journyx.com/oauth/token",
  "revocation_endpoint": "https://example.apps.journyx.com/oauth/revoke",
  "scopes_supported": ["jx:identity", "jx:time", "jx:time:write", "..."],
  "response_types_supported": ["code"],
  "grant_types_supported": ["authorization_code", "refresh_token"],
  "token_endpoint_auth_methods_supported": ["none"],
  "code_challenge_methods_supported": ["S256"],
  "authorization_response_iss_parameter_supported": true
}
Protected-resource metadata (RFC 9728):
GET /.well-known/oauth-protected-resource HTTP/1.1
Host: example.apps.journyx.com
{
  "resource": "https://example.apps.journyx.com/api/v1",
  "authorization_servers": ["https://example.apps.journyx.com"],
  "scopes_supported": ["jx:identity", "jx:time", "jx:time:write", "..."],
  "bearer_methods_supported": ["header"]
}
The protected-resource document is also referenced from the WWW-Authenticate
header on a 401 response (see Error handling), which lets a
compliant client discover the authorization server starting from a single
unauthorized API call.
The Authorization Code + PKCE flow
This is the sequence your app follows to obtain an access token. The example
uses the base URL https://example.apps.journyx.com; replace example with
your own site name.
Step 1 — Generate a PKCE verifier and challenge
Create a high-entropy, random code_verifier, then compute the code_challenge
as the base64url-encoded SHA-256 of the verifier. Only the S256 method is
supported; plain is rejected.
code_verifier  = dBjftJeZ4CVP-mB92K27uhbUJU1p1r_wW1gFWFOEjXk
code_challenge = E9Melhoa2OwvFrEMTJguCHaoeK1t8URWbuGJSstw-cM   (S256 of the verifier)
Keep the code_verifier in memory; you will need it in Step 4.
Step 2 — Send the user to the authorization endpoint
Open a browser to /oauth/authorize with your request parameters. Also generate
a random state value and keep it, so you can verify it when the user returns.
GET /oauth/authorize?response_type=code
    &client_id=YOUR_CLIENT_ID
    &redirect_uri=https://yourapp.example.com/callback
    &scope=jx:identity%20jx:time:write
    &code_challenge=E9Melhoa2OwvFrEMTJguCHaoeK1t8URWbuGJSstw-cM
    &code_challenge_method=S256
    &state=RANDOM_OPAQUE_VALUE HTTP/1.1
Host: example.apps.journyx.com
Required parameters:
response_type=codeclient_id— your registered client identifier.redirect_uri— must exactly match one registered for your app. Native and desktop apps may use anhttp://localhost/ loopback redirect.scope— a space-separated list of scopes your app is requesting.code_challengeandcode_challenge_method=S256(PKCE is mandatory).state— an opaque value your app generates; Journyx returns it unchanged so you can protect against CSRF and correlate the response.
Step 3 — The user signs in and consents
If the user does not already have a Journyx session, Journyx runs the site's configured sign-in (local password or an SSO provider such as Microsoft Entra or OpenID Connect). Then Journyx shows a consent screen that displays your app's name, the site being accessed, and the access it is requesting, presented as selectable connection levels (see Consent).
Step 4 — Receive the authorization code
When the user approves, Journyx redirects back to your redirect_uri with a
short-lived, single-use code, your original state, and an iss (issuer)
parameter you should verify matches the site:
HTTP/1.1 302 Found
Location: https://yourapp.example.com/callback?code=AUTH_CODE_HERE
    &state=RANDOM_OPAQUE_VALUE
    &iss=https://example.apps.journyx.com
Verify that state matches the value you sent, and that iss matches the site
you contacted, before continuing.
Step 5 — Exchange the code for tokens
POST the code to the token endpoint, along with the code_verifier from
Step 1. The request is application/x-www-form-urlencoded. There is no client
secret (public client).
POST /oauth/token HTTP/1.1
Host: example.apps.journyx.com
Content-Type: application/x-www-form-urlencoded

grant_type=authorization_code
&code=AUTH_CODE_HERE
&redirect_uri=https://yourapp.example.com/callback
&client_id=YOUR_CLIENT_ID
&code_verifier=dBjftJeZ4CVP-mB92K27uhbUJU1p1r_wW1gFWFOEjXk
The response contains your tokens:
{
  "access_token": "OPAQUE_ACCESS_TOKEN",
  "token_type": "Bearer",
  "expires_in": 900,
  "refresh_token": "OPAQUE_REFRESH_TOKEN",
  "scope": "jx:identity jx:projects jx:time jx:time:write"
}
Note that the granted scope may differ from what you requested — it reflects
what the user consented to and what the site allows, after the
scope rules are applied (for example,
jx:time:write also grants jx:time).
Step 6 — Call the API with the access token
Send the access token in the Authorization header on your /api/v1 requests:
GET /api/v1/entry_sheets/time HTTP/1.1
Host: example.apps.journyx.com
Authorization: Bearer OPAQUE_ACCESS_TOKEN
Accept: application/json
Using Bearer tokens
- Present the token as
Authorization: Bearer <access_token>. - Bearer tokens are honored only on
/api/v1/*endpoints. They are not accepted on the legacyjxAPI, Reportlink, file downloads, or the web UI — those require cookie authentication. - The token method is header only; tokens are never read from the query string or request body.
- Unlike cookie-authenticated
POST/PUT/DELETErequests, Bearer requests do not require theOriginandX-Requested-Withanti-CSRF headers (a Bearer token is never attached automatically by a browser). You do still sendContent-Type: application/jsonon requests with a JSON body, and theIf-Matchheader onPUT. - Permissions are evaluated live on every request. If the user's roles change or the user is deactivated, or an admin revokes your app, the very next request is affected — access does not linger until the token expires.
- Administrative abilities are dropped from every Bearer request, so connecting your app with an administrator account does not widen what it can reach. The account needs the relevant abilities assigned through ordinary roles. See Administrators are not privileged over OAuth.
Refreshing tokens
Access tokens expire quickly (15 minutes by default). Use the refresh token to obtain a new access token without sending the user through the browser again:
POST /oauth/token HTTP/1.1
Host: example.apps.journyx.com
Content-Type: application/x-www-form-urlencoded

grant_type=refresh_token
&refresh_token=OPAQUE_REFRESH_TOKEN
&client_id=YOUR_CLIENT_ID
Refresh behavior your client must handle:
- Rotation — each refresh returns a new refresh token and invalidates the old one. Always store the newest refresh token from each response.
- Reuse is a theft signal — presenting an already-used (rotated-out) refresh token immediately revokes the whole connection. Never retry a refresh with an old token.
- Lifetimes — the refresh token has a 30-day sliding window (each use extends it), with a 12-month absolute cap, after which the user must re-consent. These defaults can be adjusted by an administrator.
Revoking access
Your app can proactively revoke a token (RFC 7009):
POST /oauth/revoke HTTP/1.1
Host: example.apps.journyx.com
Content-Type: application/x-www-form-urlencoded

token=OPAQUE_ACCESS_OR_REFRESH_TOKEN
&client_id=YOUR_CLIENT_ID
Users can also revoke your app themselves at any time from the OAuth connected apps screen in their Journyx profile, and administrators can disable an app — either action immediately invalidates the app's tokens.
Consent and connection levels
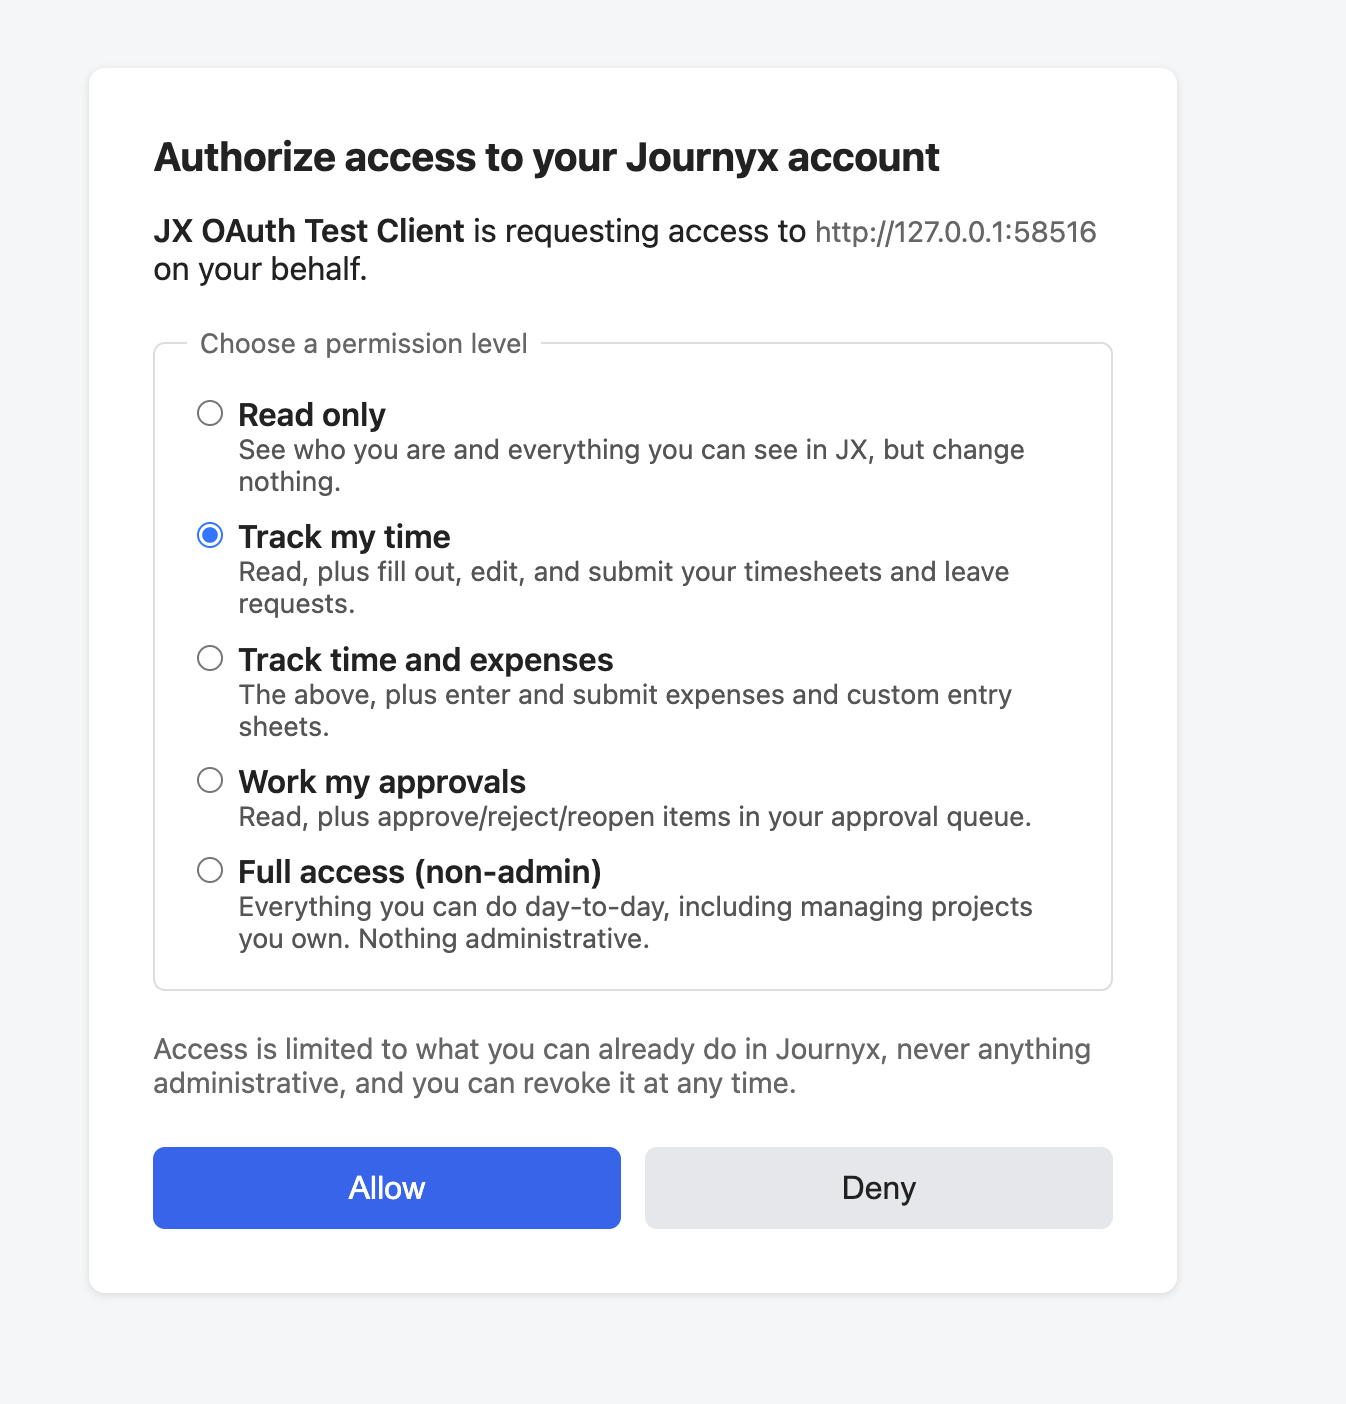
On the consent screen the user picks a connection level — a named bundle of access. The built-in levels are:
| Connection level | What it grants |
|---|---|
| Full read-only access | See who you are and everything you can see in JX, but change nothing. |
| Suggest my entries | Feed calendar events and other activity into your Suggested Entries, and read them back. Cannot see or change your timesheets. |
| Track my time | Read, plus fill out, edit, and submit your timesheets and leave requests, and suggest entries for them. |
| Track time and expenses | The above, plus enter and submit expenses and custom entry sheets. |
| Work my approvals | Read, plus approve/reject/reopen items in your approval queue. |
| Full access (non-admin) | Everything you can do day-to-day, including managing projects you own. Nothing administrative. |
The consent screen also shows the difference between what your app requested and what the chosen level grants, so users can make an informed decision. Administrators can customize this list. See the Scopes reference for the full scope vocabulary behind these levels.
Registering a client application
Every client needs a client_id. A client_id on its own confers no access —
all access comes from a user consenting. There are three ways an app is
registered, and all require an administrator's involvement before a user can
connect:
-
Manual registration (the usual path) — an administrator registers your app in the Journyx admin UI, entering its name and redirect URIs, and Journyx issues a
client_id. Manually registered apps are approved on creation. -
Dynamic Client Registration (DCR, RFC 7591) — your app can
POSTits own registration to/oauth/register. This is disabled by default; when an admin enables it, self-registered apps are created in a pending state and cannot be connected until an admin approves them. DCR is for public clients only (token_endpoint_auth_method: none), requires PKCE, and requires exacthttpsredirect URIs (with anhttp://localhostexception for development). A registered client can manage itself via RFC 7592 at/oauth/register/{client_id}using the registration access token returned at registration. -
Client ID Metadata Documents (CIMD) — for apps identified by an
httpsURL that hosts a client metadata document (used by some AI/agent platforms). This is honored only for hosts an administrator has explicitly allowlisted, and the allowlist is empty by default.
Administrators manage all of this on the OAuth app settings screen (Settings → System Settings → OAuth app settings). Apps are listed by their registration Source (manually added, self-registered via DCR, or added by URL via CIMD); pending apps are approved or denied there; and an app can be registered manually with the "Register an app manually" form:
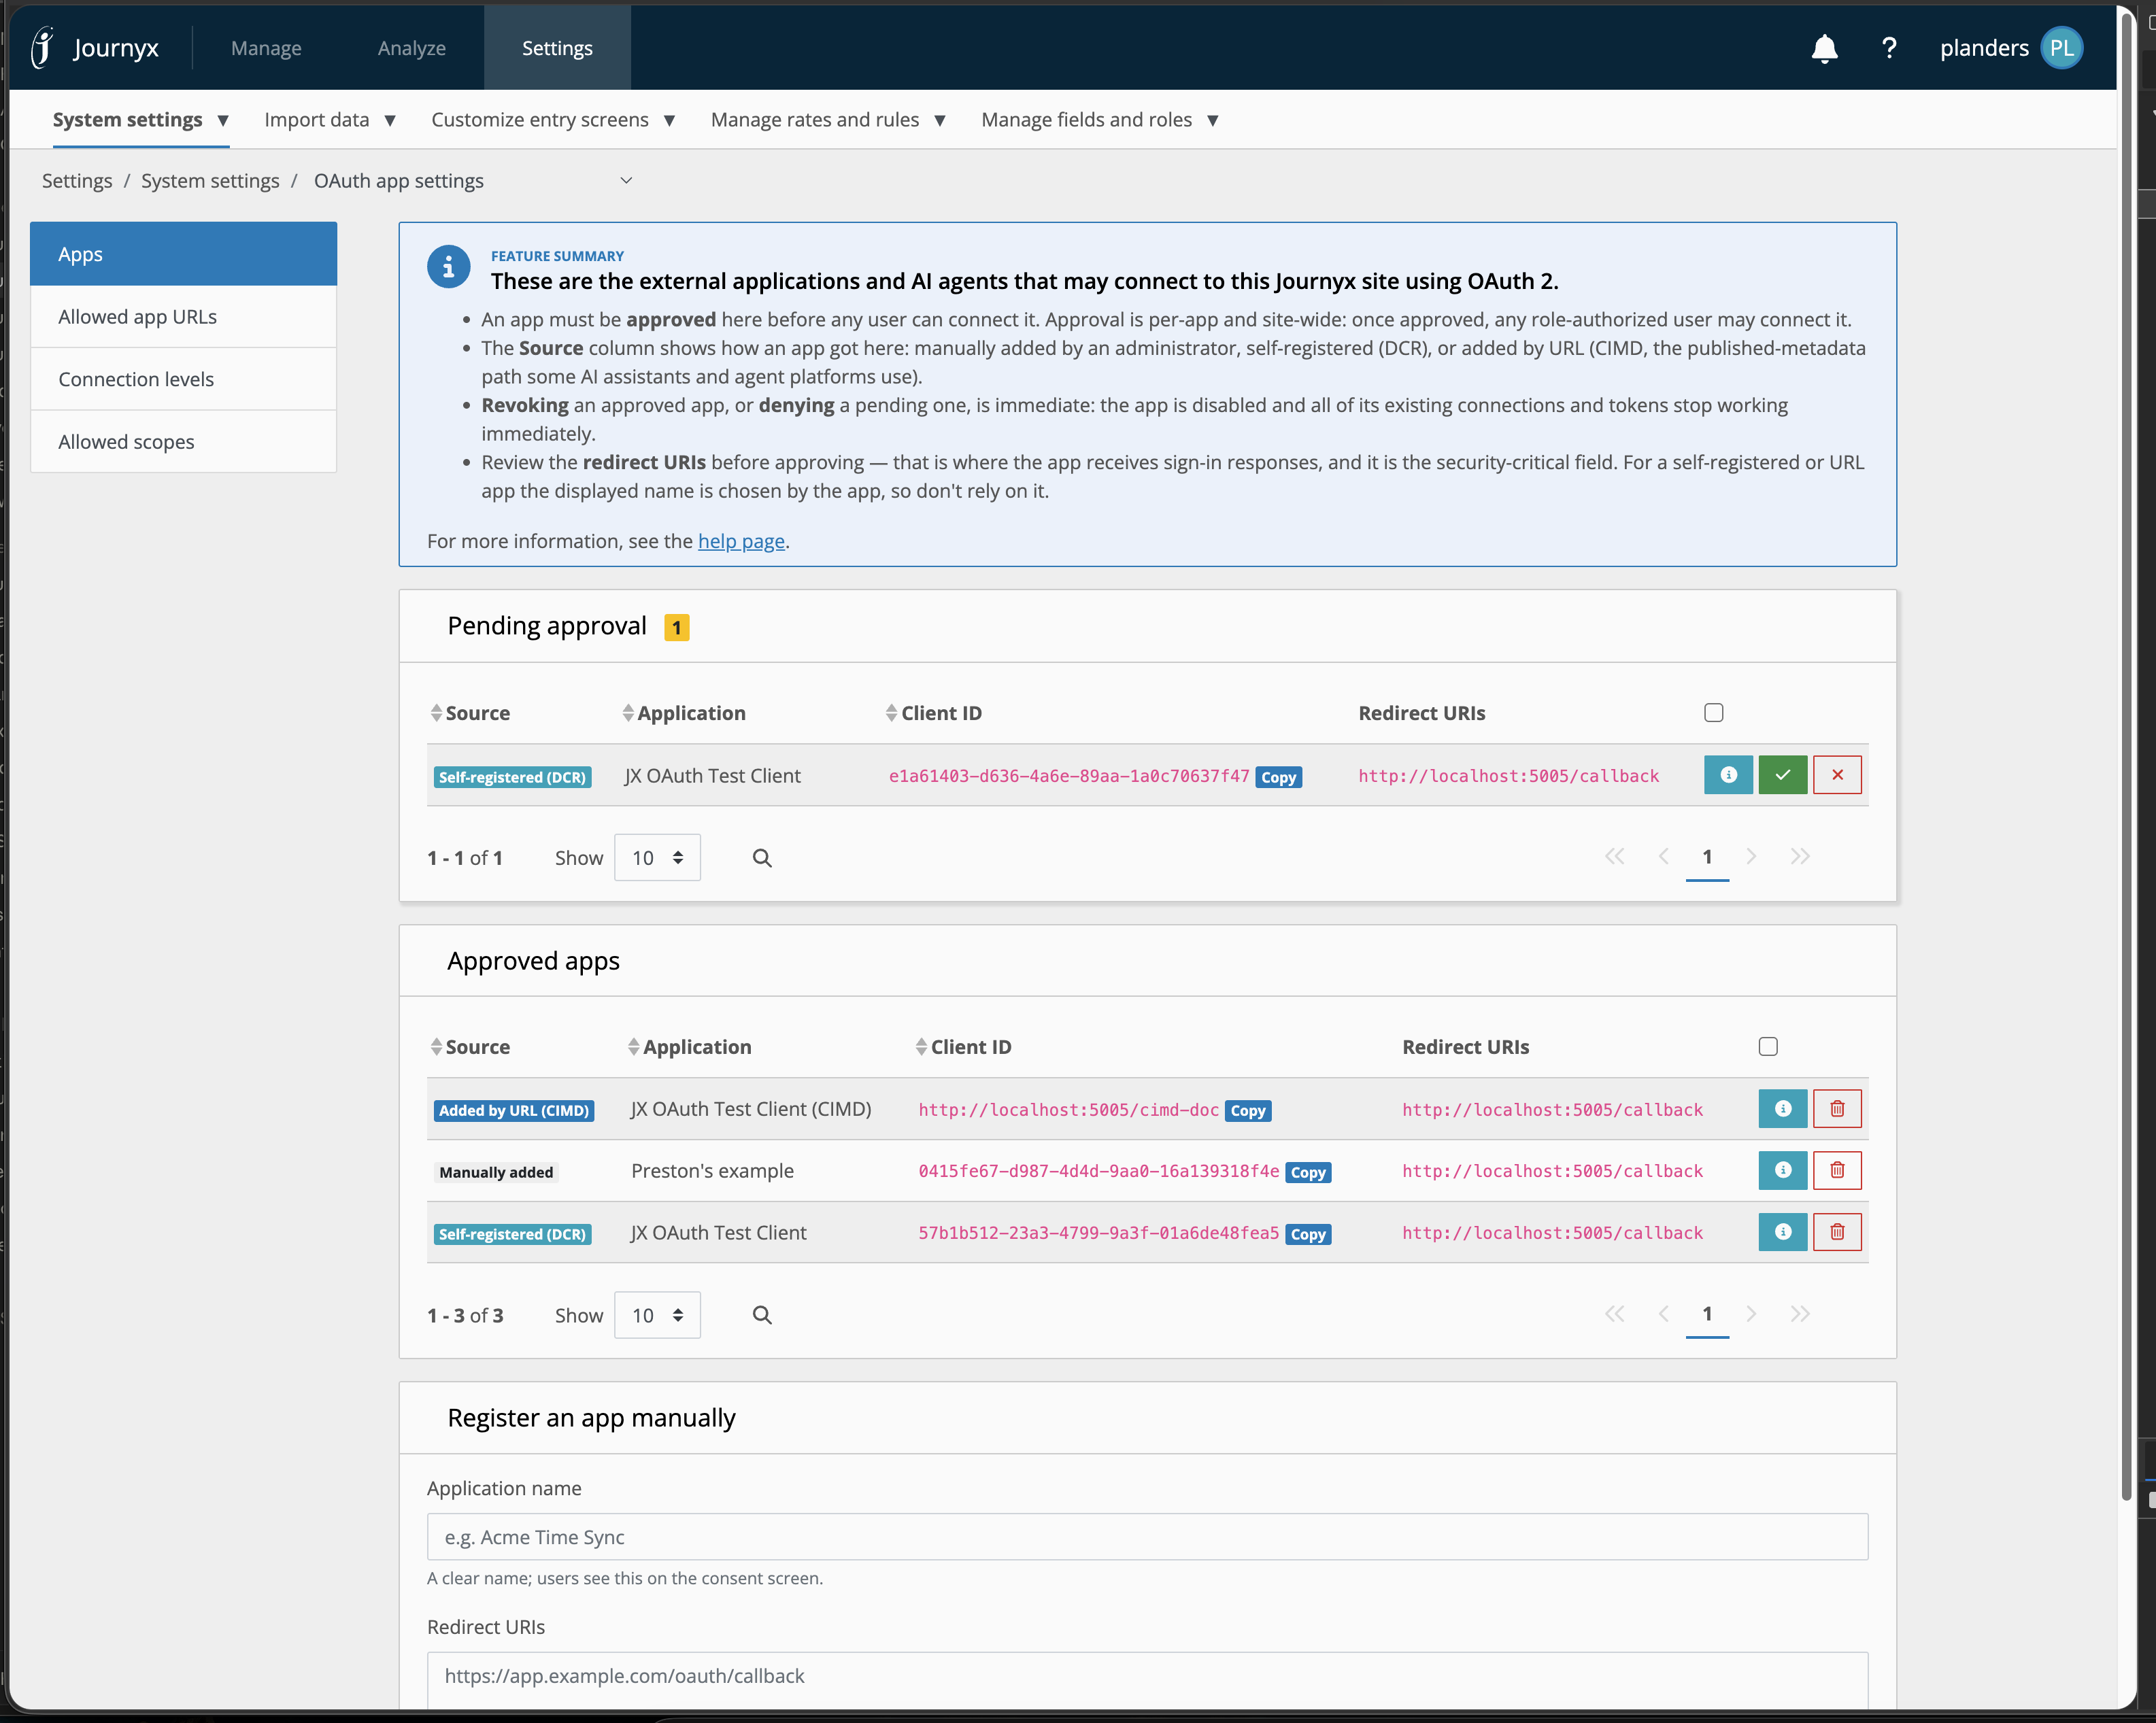
Changing a registered app's name or redirect URIs puts it back into a pending state until an admin re-approves it. Existing tokens keep working, but no new users can connect until the change is approved. This prevents an approved app from silently changing where authorization codes are sent.
The /api/v1/userinfo endpoint
To read the signed-in user's basic identity, call
GET /api/v1/userinfo. This is a thin profile
read that requires the jx:identity scope:
GET /api/v1/userinfo HTTP/1.1
Host: example.apps.journyx.com
Authorization: Bearer OPAQUE_ACCESS_TOKEN
{
  "userId": "84A9E688C8AF4931B206F0423C3F70EA",
  "username": "jdoe",
  "name": "John Doe",
  "email": "jdoe@example.com"
}
userId and username are always present; name and email are omitted when
they are not set. This endpoint returns only identity — never abilities,
roles, groups, or menu data.
Despite the name, /api/v1/userinfo is a plain Journyx REST resource, not an
OpenID Connect UserInfo endpoint. Journyx does not act as an OpenID Connect
provider and issues no ID tokens.
Error handling
Bearer authentication failures follow
RFC 6750. Inspect the HTTP status and
the WWW-Authenticate header:
-
401 Unauthorized— the token is missing, invalid, expired, or revoked (error="invalid_token"). Refresh the token, or start a new authorization flow. TheWWW-Authenticateheader includes aresource_metadatapointer to the protected-resource discovery document.HTTP/1.1 401 UnauthorizedWWW-Authenticate: Bearer realm="Journyx", error="invalid_token",error_description="The access token is invalid, expired, or revoked.",resource_metadata="https://example.apps.journyx.com/.well-known/oauth-protected-resource/api/v1" -
403 Forbiddenwitherror="insufficient_scope"— the token is valid but its scopes do not cover this operation. The required scope is named in thescopeparameter of theWWW-Authenticateheader. Your app needs the user to re-consent with the broader scope.HTTP/1.1 403 ForbiddenWWW-Authenticate: Bearer realm="Journyx", error="insufficient_scope",scope="jx:time:write",resource_metadata="https://example.apps.journyx.com/.well-known/oauth-protected-resource/api/v1" -
A
403with noscopevalue means the endpoint is never reachable with a Bearer token (administrative, credential-management, and session endpoints are cookie-only). See Endpoints that require cookie authentication.
The JSON body of a Bearer error also carries a machine-readable code:
{
  "success": false,
  "errors": ["The access token is invalid, expired, or revoked."],
  "response_code": 401,
  "error_code": "invalid_token"
}
What is not supported yet
The following are intentionally not available in this release. Do not design against them:
- Client credentials / machine-to-machine grant. There is no way to obtain a token without a user consenting in a browser. For unattended, server-side automation, use an API Key with the session-cookie flow.
- Device authorization grant (RFC 8628).
- Token introspection (RFC 7662) — tokens are validated by the resource server internally; there is no public introspection endpoint.
- ID tokens / OpenID Connect provider functionality (Journyx is an OAuth authorization server for its own API, not an OIDC identity provider).
Next steps
- Scopes reference — the full list of scopes, how they combine, and which endpoints they cover.
- Authentication overview — how OAuth compares with session-cookie and API-key authentication, and how to choose.