Journyx API tutorial
This tutorial will guide you through the process of making your first API request to the Journyx API. You will need a Journyx account with API access enabled, and an API key to authenticate your requests.
If you haven't already, be sure to read the REST interaction overview section.
Back to the documentation main page.
REST API interaction summary
As discussed in the REST overview section, each resource
or object in the system has a unique URL in the API. You interact with these
objects by sending HTTP requests to the server; for example, the GET method is
used to retrieve a resource (or a collection of them), the POST method is used
to create a resource, and DELETE is used to delete a resource. This tutorial
will sometimes refer to resources and objects interchangeably.
While it's entirely possible to construct these requests on a Linux command line
(with wget or curl), or a Python script, or in the JavaScript console, or
with any other tool that understands HTTP, it's often easier to use a
specialized HTTP request tool like Postman to make API requests for learning or
experimentation purposes. Developer environments like
Visual Studio Code and
JetBrains PyCharm Professional also have
these features built in.
Making REST API requests in VS Code
This section provides a tutorial on how to make API requests directly in Visual Studio Code (VS Code) without writing a full client program. Hopefully, this introduction to directly making API calls will help inform your future programming and make writing client code easier.
Using VS Code is not required to make API requests or to follow along with this tutorial. There are other tools like Postman or PyCharm Professional that can be used to make direct API requests as well. We are using VS Code in this tutorial because it is a popular IDE and it makes it easy to directly construct HTTP requests. Experienced developers can use any preferred tools and programming languages to interact with the API as well, because it's HTTP based and works with any programming language.
In order to make API requests, you'll need at least two basic pieces of information:
-
Your server's base URL, e.g.
https://example.apps.journyx.com -
An account (username) and an API key or password to authenticate your requests, which will be discussed in more detail below.
For reasons that will become apparent, we will largely assume in this tutorial that you are using an Admin-level account for purposes of management, control, and data import/export. In general, a "regular time entry user" account will only have access to API features needed for time entry purposes.
For instance, assume we have our Journyx server instance
https://example.apps.journyx.com, and we want to make API requests to this
server. Obviously, we can write a Python (or JavaScript, or C#, etc.) program
that makes API calls. But it is nice to have a more straightforward way to
simply make calls directly and observe responses. This can also help with the
initial development of a new API as you can begin testing calls against it
immediately, or even before you begin writing it. You can sketch out the
interactions and data formats before you write a single line of code. Using
tools like VS Code's
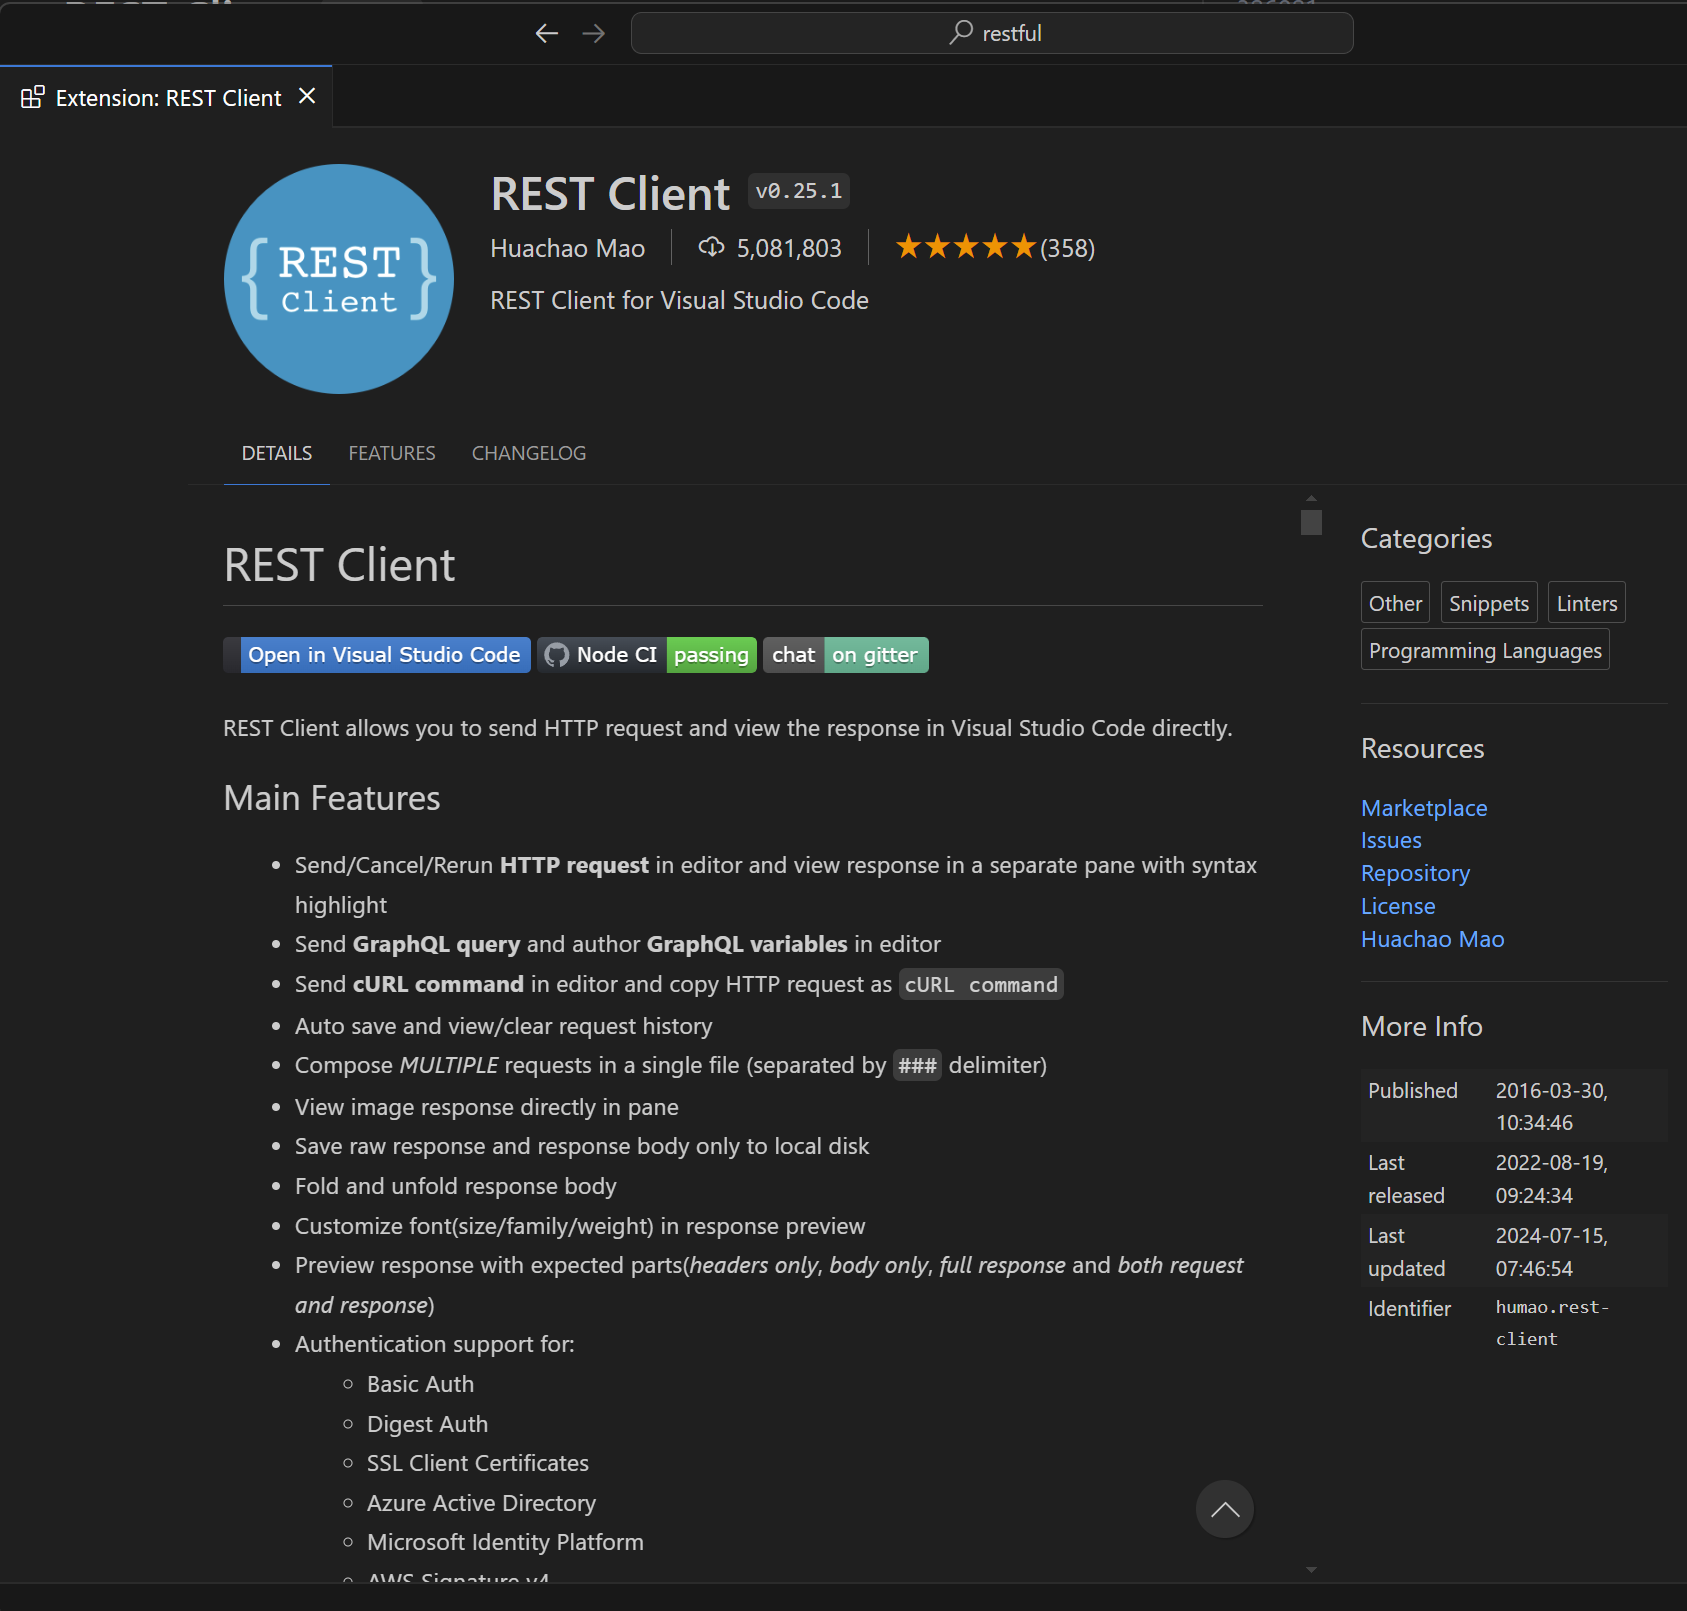
REST Client Extension
, you can then save these requests to review or replay later.
Using the REST Client extension
To get started in Visual Studio Code, first
install the
REST Client extension
then create a new file with a .http extension. This will allow you to write
HTTP requests directly in the file and run them to see the responses.
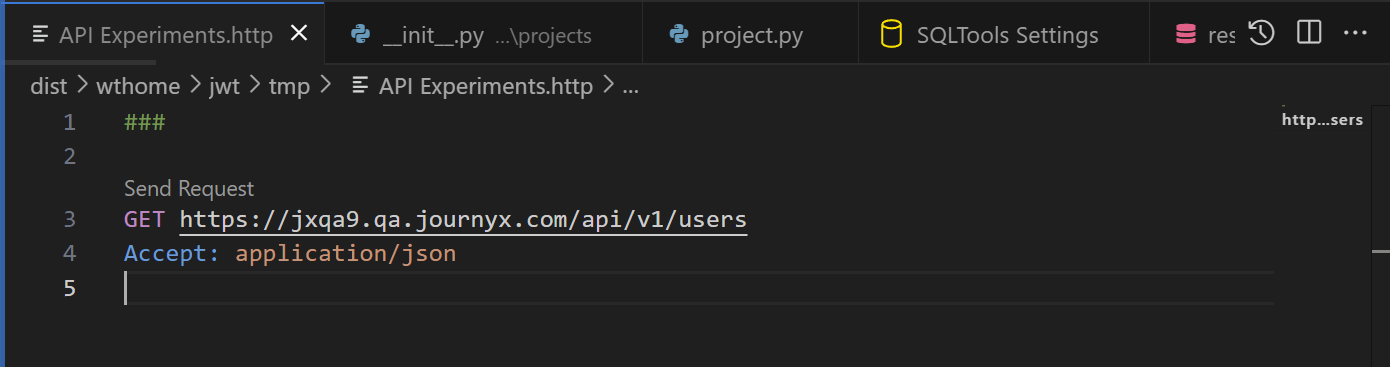
This extension provides a simple format where you can type out structured HTTP requests and execute them to see the results. Give the file a name like "API Experiments.http" and start editing the file.
It's important to separate multiple requests with a line that has ### as shown
in the screenshot below. This is how the REST Client extension knows where one
request ends and the next one begins.
To make your first API request, first make sure you have the extension installed and an ".http" file open. Then, in the HTTP Request file, you can try typing the following lines:
###

GET https://example.apps.journyx.com/api/v1/users
Accept: application/json
Be sure to replace example.apps.journyx.com with your own Journyx server
instance URL. Please note that the screenshots provided below will show a
different URL, but you should use your own server URL.
Above the GET line, you should see the text "Send Request" as shown here. If
you do not see this, the extension may not be installed or you may not have the
file open with a .http extension.
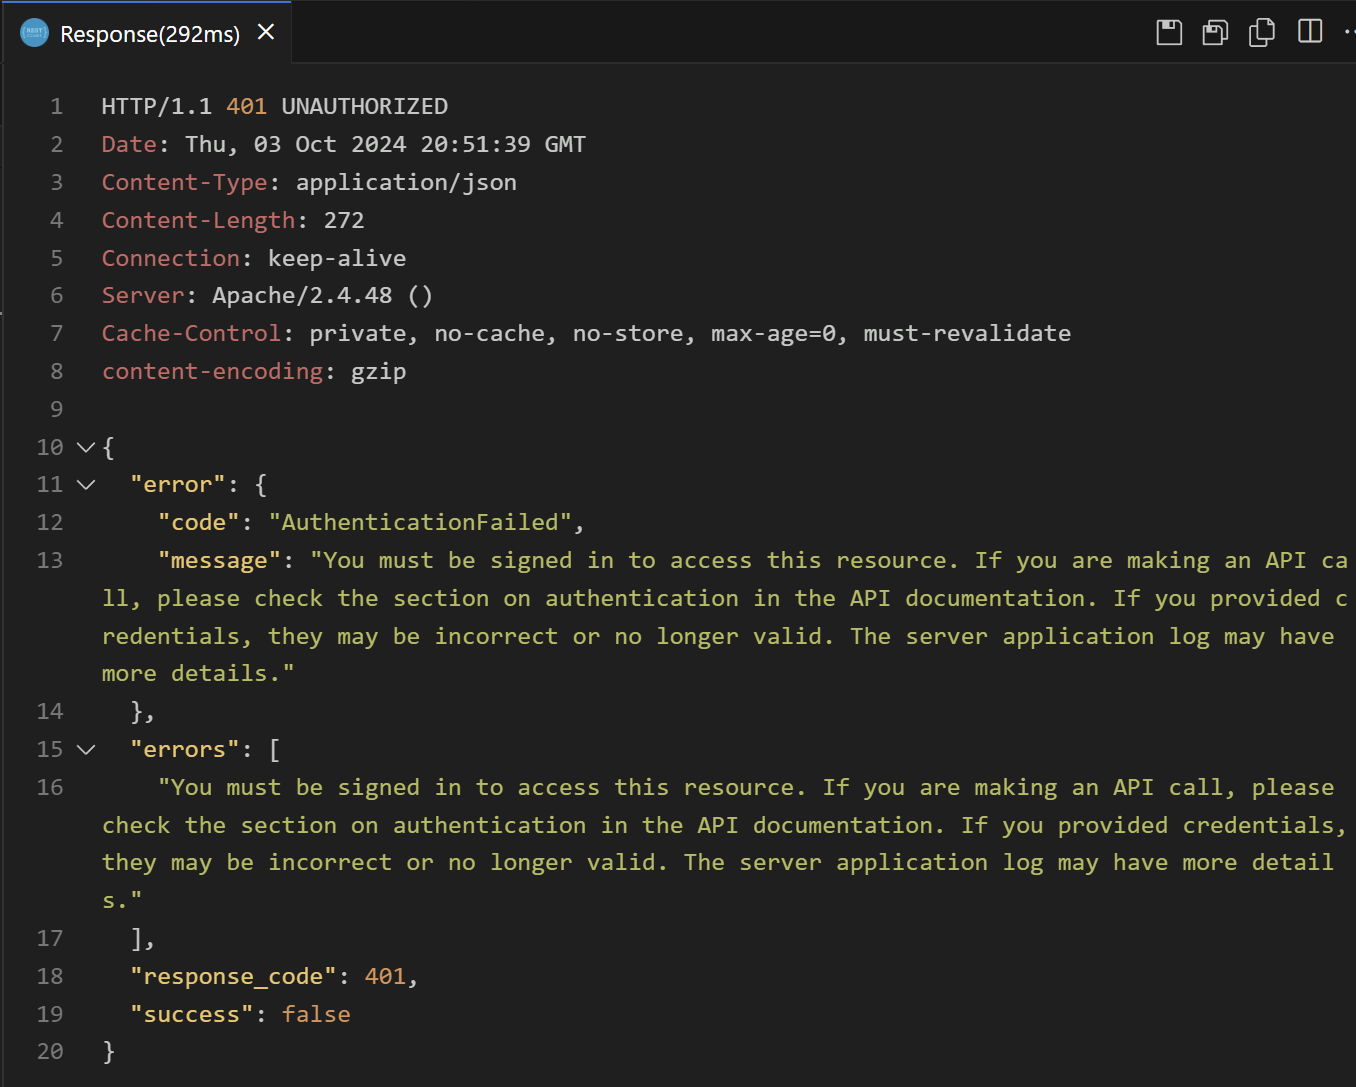
Click the "Send Request" link and you should see some output appear in a new window:
Authenticating requests
Notice that it says the server's response code is 401 UNAUTHORIZED and the
error message mentions needing to be signed in to access that resource. At this
point you may be wondering about authentication. Almost all requests in the API
require you to be signed in. A notable exception would be the URL
/api/v1/login, for obvious reasons. Your signed-in identity determines the
resources and actions that you have access to.
If you see a 401 Unauthorized response, it means you need to authenticate your
request.
For the moment, let's assume you know the login and password of an Administrator account and use that. If single sign-on (SSO) is being used by the site, things become a little more complicated because you have to use an API Key, so for now let's assume the internal password database is available. (SSO vs internal can also be configured on a per-account basis.) Writing production-ready authentication code is beyond the scope of this tutorial, but is covered more in the Authentication section. An API Key can be substituted for a password in most cases, including with SSO.
There are two main ways to send an authenticated request to the Journyx API:
-
HTTP Basic Authentication - this sends the username and password every time, on every request. This is insecure if the site is not using HTTPS secure encryption. However, all Journyx hosted sites use HTTPS secure mode, which helps mitigate any security impact. However, it is still considered preferable to use the other method discussed below (
wtsessioncookie), if only for performance reasons. HTTP Basic Authentication is convenient for quick examples and learning or development purposes, but is not ideal for production use because it is less performant and less secure.- See also the MDN docs on Basic Auth.
-
The
wtsessioncookie is the preferred method of authentication. Instead of sending the username and password with every request, you send a cookie that contains a secret session ID. To obtain a session cookie, send aPOSTrequest to/api/v1/loginwith a JSON body like:{"username": "Preston","password": "1234"}This will respond with a
Set-Cookiefor a cookie namedwtsession. Capture this and send it as a cookie header with future requests. You can also find this value in theX-Session-Idheader as mentioned below, if cookies are inaccessible for some reason. Thewtsessioncookie should be returned to the server in future requests in aCookieheader. As we will see below, VS Code can help with this when using the REST Client extension. -
There are other authentication methods useful to REST APIs including JSON Web Tokens, and OAuth, but those aren't currently supported in Journyx.
Basic Auth example
For purposes of this example, we'll use Basic Auth. To add basic auth to our example request, we just need to add a header line for it, but it uses an encoded format. Fortunately, the VS Code REST Client extension can handle this for us so we don't have to concern ourselves with the details of the encoding. If you're using a Python script or other client program to make these API calls, you will likely have to call a library function to handle the encoding. But in VS Code we can just put the raw username and password, then click the Send Request link to run it:

The REST Client extension handles the details of encoding the username and
password for you for the Authorization header. If you're writing a program in
Python or another language, you will need to encode the username and password
yourself. The details of how to do that
vary by language.
Click the Send Request link and you should see some output in the lower area:
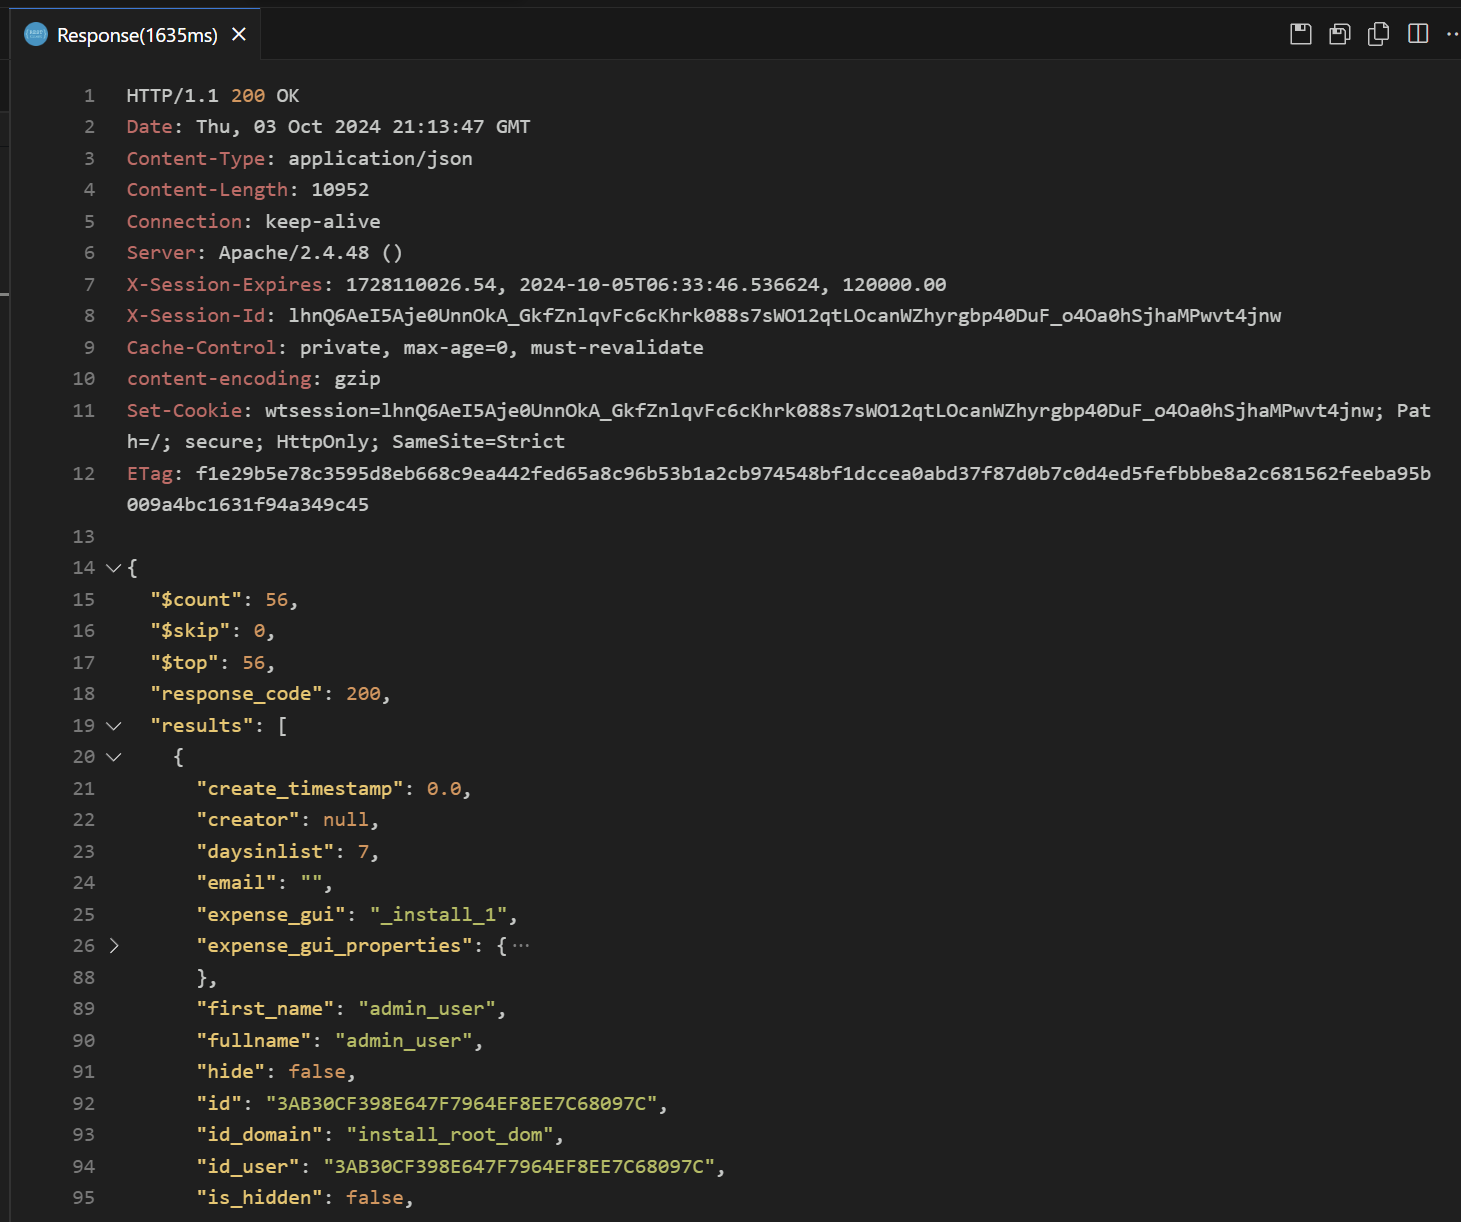
Now we see something a little more interesting; this looks like actual usable data. This is a collection response for the Users collection. You can see that the response is structured as a single JavaScript object with some top level keys. Here are some of the keys you will commonly see in this response object. Not all of these are shown in the picture above.
$count$skip$top@nextLinkresponse_coderesultsscreensuccessuri
These keys are common to virtually all collection responses and are discussed in detail on the Collections and REST Overview pages.
The REST Client extension in VS Code can preserve any cookies set by the
response, including the wtsession authentication cookie, so it may seem that
the Basic Authentication line is only necessary on the first request, or at
least until the session expires. This feature may not be turned on by default
but it can be activated by turning on the
rest-client.rememberCookiesForSubsequentRequests setting in the VS Code
settings.
However, Basic Auth specifically makes a 1-request session that is no longer
valid after the request completes, so the Set-Cookie line is actually useless
when Basic Auth is used. To get a persistent web session cookie, use the
/api/v1/login URL as mentioned above. VS Code will remember that cookie and
allow you to use it in subsequent requests.
Most of the example requests and screenshots in this tutorial do not show an
authentication header, but you will always need to
include one. The REST Client extension in VS Code can automatically remember and
send the wtsession cookie for you if that feature is enabled. Any
client programs you write may need to handle
this manually.
Response headers
As shown in the screenshot above, the server also responded with several headers
in addition to the main body of the response. You can see the HTTP protocol
version and main response code on the top line: HTTP/1.1 200 OK. This
indicated we got a valid response for this resource (URL) and can proceed
accordingly. It also tells us that the content type of the response is
application/json MIME type and
that it's 10952 bytes long.
It's important to check the HTTP response code for errors. A 200 OK response
generally means that the request was successful, but other codes like
401 Unauthorized or 404 Not Found indicate problems. Be sure to
check all responses for errors!
We also see something called an Etag that we'll come back to later; this is
like a cryptographic hash of this specific version of response that can be used
to detect if our local cached copy is no longer valid due to changes in the
server. We will come back to the ETag
later because it is necessary to
make changes to an existing item.
We also see that the server added a Set-Cookie header for the wtsession
authentication cookie as discussed above; we can send this back in future
requests to authenticate them without using the less-secure Basic Auth header.
(Note that security for session cookies still depends on using
HTTPS secure encryption.) However, when
Basic Auth is used, this cookie will not work for future requests. But if you
get a wtsession cookie at the /api/v1/login endpoint mentioned above, you
can reuse it on future requests.
There are also two headers prefixed with X-; these are custom headers that are
specific to Journyx. The server can put any additional headers it wants on any
given request to supply extra information for the client, typically this is
"side-channel" data that is not directly incorporated into the response body.
For instance, we have X-Session-Expires, which tells us when our wtsession
login cookie will expire, and we have X-Session-Id, which is another copy of
the wtsession cookie, but placed outside the Set-Cookie header. This is
primarily to make it easier for the mobile app to access it, because
restrictions can sometimes be placed on extracting (reading) cookies.
Response data keys
As mentioned above, there are several keys that are common to our REST API responses. This helps keeps things consistent between objects. Some of the keys are only present in Collections (lists of objects) and not present on individual objects. Let's go over these response data keys in detail.
The first few response keys are common to both collections and individual
objects. Some keys like error are only present when relevant. Also keep in
mind that just because the server returns a JSON object doesn't mean your
request worked; errors can also return structured JSON data. Always check the
HTTP response code.
-
response_code- simply repeats the HTTP response code already given on the first line of the HTTP response. This can make it more convenient to access in certain scenarios. This only includes the number portion. -
success- a boolean that indicates, in general, whether the request succeeded or an error code was generated. -
uri- the same URL of the request reflected back for informational purposes, usually as a server-relative URL. -
results- either an object dictionary for the main object, or else a list of these when it's a collection. Objects are discussed in more detail below. This is the meat of the response and could be considered the actual (representation of) the resource. -
error- a dict with 2 keys representing the main or outermost error, if there was any error.code- a consistent error code such asNotFoundOrNotAuthorizedmessage- the error string or message specific to the situation.
-
errors- a list (array) of error strings. May contain only 1 item, but sometimes more. Useful if multiple errors are present, as it can help the client solve multiple problems or provide additional feedback.
status,info,warnings- lists of additional status messages that may not always be present. These are typically presented to the user for additional feedback.
The next set of response keys are only in collections:
-
$count- the total number of items in the result set, given whatever filters are applied. Not all available results in the total set are necessarily included in the response; you may have to page through them. -
$skip- the number of results skipped over as part of pagination. Your starting point in the slice of the total collection represented in the response. If$skipis 0 then you're on the first page of results. -
$top- the number of results shown in the current slice in pagination. If $top plus $skip is equal to $count, then you're on the last page of results. -
@nextLink- a link to obtain the next page of results, if any. If this is missing, you're on the last page of results. -
screen- additional metadata for the UI screen associated with this REST API, if any. This may not always be present and is described in more detail elsewhere (TODO).
This section concludes the initial walkthrough of how to make a REST API call. The rest of this document will go into greater detail about each aspect of this, including how to create, modify, or delete objects, query a collection using a filter, and other topics.
Cookie authentication and required headers
As mentioned above, there are a few ways to authenticate, without even considering Single Sign On (SSO). For now we will assume use of the internal password database. Working with API under Single Sign On is exactly the same in almost all cases except you will need to use an API Key instead of a password.
Reviewing the standard login flow also illustrates several other required
elements for making API calls; namely, the Origin or Referrer request
headers, as well as X-Requested-With and the Accept and Content-Type
headers.
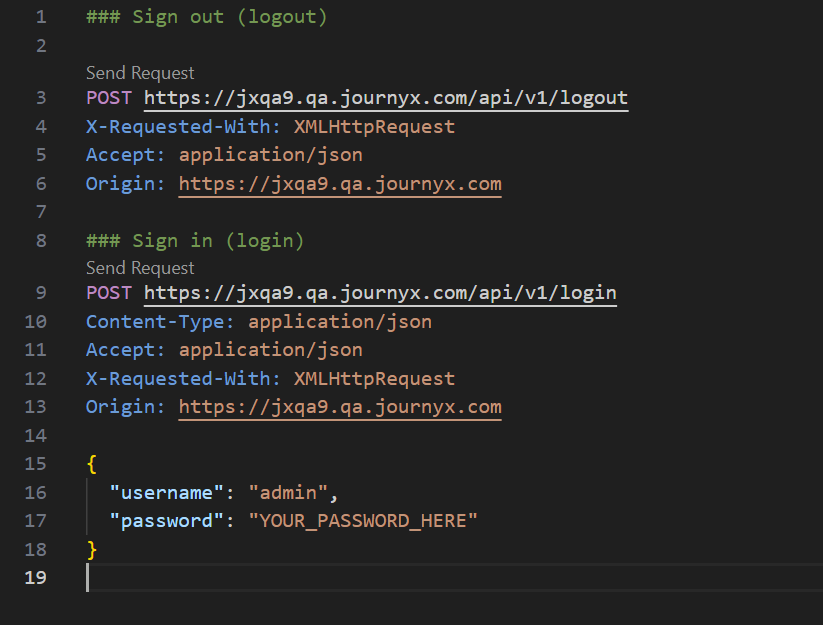
First let us consider the logout (sign out) resource / functionality. If you
make this API call while signed in, you'll get a 200 OK response, indicating
you were signed in, but the logout request was successful and now your session
has ended. However, if you call logout while you're not authenticated,
you'll get a 401 Unauthorized response, with a message that says that you must
be signed in to run this request. This illustrates how server responses and
response codes are context sensitive.
Next, we'll write the /api/v1/login call. Like the logout call, you must add a
few headers to make it work correctly. These headers will be explained later.
Both of these calls use POST because we are creating something (a login
request, or a logout request.) Arguably, to be more "REST-ful", we should be
able to use the DELETE method on a session resource, but that isn't how it's
currently set up.
The server response to the Sign In request is shown here:
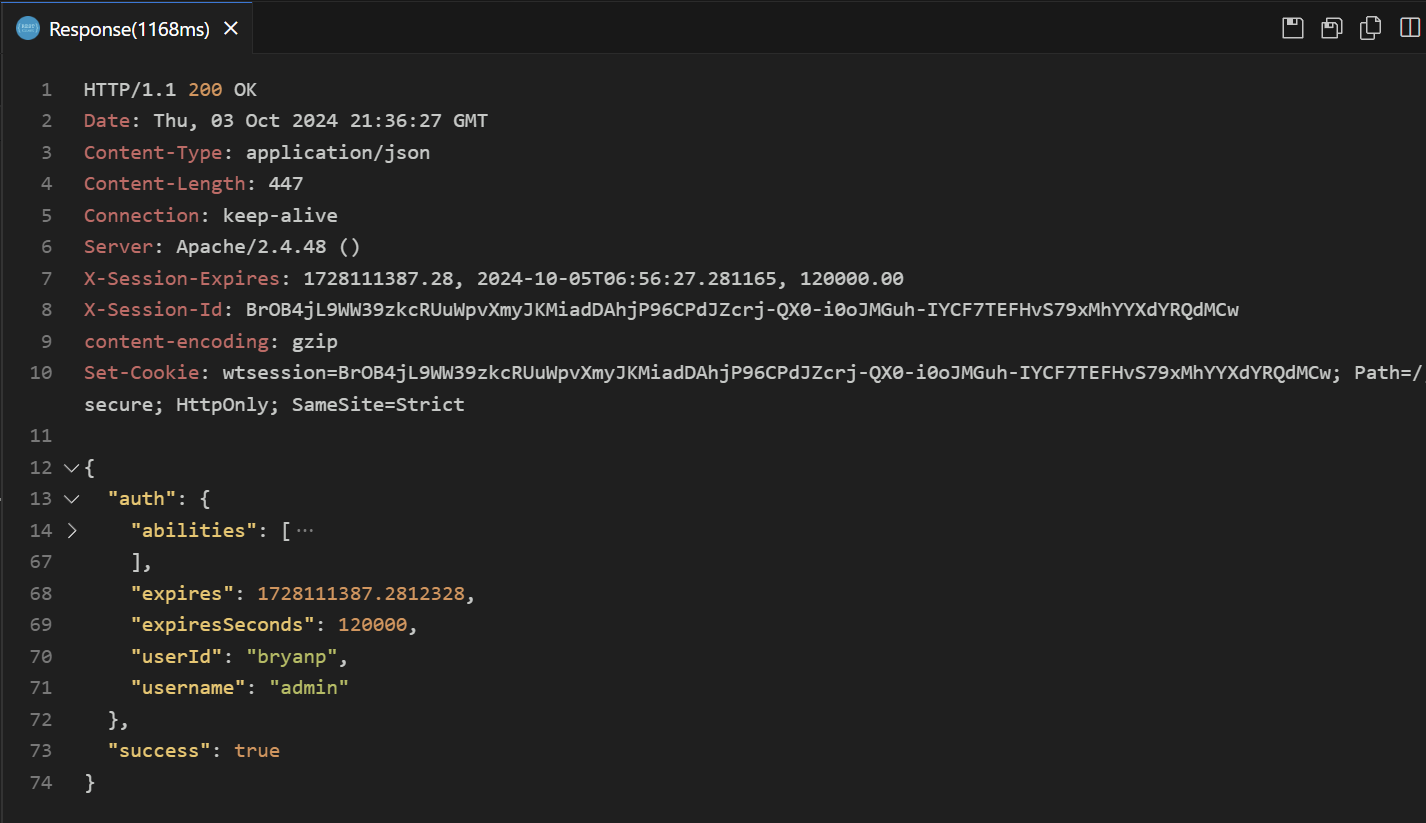
As you can see, the wtsession cookie is contained in both Set-Cookie line,
which VS Code's REST Client extension will remember for the following requests,
as well as in the X-Session-Id. That header, along with X-Session-Expires,
were discussed above.
Accept and Content-Type headers
Also notice that we set the Accept header to say application/json. This is
to tell the server that we prefer responses in the JSON format. If we leave this
out, certain error conditions will return HTML or other response formats, but
usually we only want to get JSON back, even when errors happen. Usually because
it's simpler to deal with JSON in a client rather than HTML. Therefore it's
important to tell the server with Accept: application/json that we prefer to
receive JSON back. When sending data to the server in JSON format, we likewise
want to tell the server explicitly that it's in that format by sending
Content-Type: application/json.
Origin and X-Requested-With headers
As shown above, there are two headers that must be present in all requests
(except for GET requests) - those are the Origin and X-Requested-With
headers. Both of these headers are required for security reasons, to prevent
cross-site request forgery
(CSRF),
click-jacking, and similar
attacks.
The Origin and X-Requested-With headers are automatically inserted when we
make API requests in the browser. However, when making standalone requests, we
must include them. If the Origin header can't be set, you can also set the
Referrer header instead or in addition to. Either one should be set to the
main URL of the site you're trying to access, or else a sub-URL of it.
X-Requested-With: XMLHttpRequest (the entire value) must always be present.
Note: these headers are not the only mitigation against CSRF and similar attacks, but are required in order to run REST API requests on Journyx.
Up next: Collections
We've covered some of the basics of making authenticated API requests in this section. Next, we will explore one of the most important concepts in the Journyx API: collections. Collections are lists of objects that can be queried, sorted, filtered, and paginated, and are the standard way to access lists of objects in the Journyx system.